Hey there, it’s Althaf! Welcome to my blog post where I’ll guide you step-by-step through the process of installing Git on your local device and sharing a file from your local repository to a Remote repository on GitHub. Whether you’re an experienced developer or just starting out, understanding Git and GitHub is a crucial skill for any modern software engineer.
In this blog post, I’ll cover everything you need to know about installing Git and using GitHub to share your code with others. If you’re new to Git and GitHub, don’t worry – I’ll make it easy to understand by breaking down the process into simple steps.
If you’re looking to deepen your understanding of Git and GitHub, be sure to check out my other blog post “Git Made Easy“, where I cover the basics of what Git is, how it works, and why it’s important.
So, without further ado, let’s dive right in and get started.
GitHub is a powerful platform that enables software developers to collaborate and share code with each other. It is a web-based hosting service that uses Git, the popular version control system, to allow developers to track changes to their code over time.
GitHub makes it easy for developers to work together on projects, even if they are in different parts of the world. It provides tools for managing and reviewing code changes, as well as features like issue tracking, project management, and team communication.
Beyond just code, GitHub is also a hub for open-source software development, with millions of open-source projects available for anyone to use or contribute to. From small personal projects to large enterprise applications, GitHub is an essential tool for modern software development.
Have you ever worked on a project with someone else and found it difficult to keep track of changes? Git is here to help!
Git is a tool that developers use to keep track of changes to their code over time. Think of it like a time machine that allows you to go back in time and see how your code has evolved.
Using Git, you can make changes to your code without worrying about messing things up. Git keeps track of every change you make, so if something goes wrong, you can easily roll back to a previous version.
Git also makes it easy to collaborate with others on a project. You can share your code with others and merge their changes into your own. This way, everyone can work on the same codebase without stepping on each other’s toes.
Alright guys, now that we’ve gotten a brief overview of what Git and GitHub are, let’s get down to business. In this section, I’ll be showing you step-by-step how to create a GitHub account.
Creating a GitHub account is easy and free, and it’s the first step to start using this powerful platform for your projects. So, bear with me, and let’s get started:
To create an account on GitHub, go to GitHub.com and click the “Sign up” button. Once you click the link you will be taken to a page similar to the one below:

After clicking on the “Sign up” option, you will be directed to a page where you can enter your desired username, email address, and a secure password. Once you have filled in the required information, click on the “Continue” button to proceed.
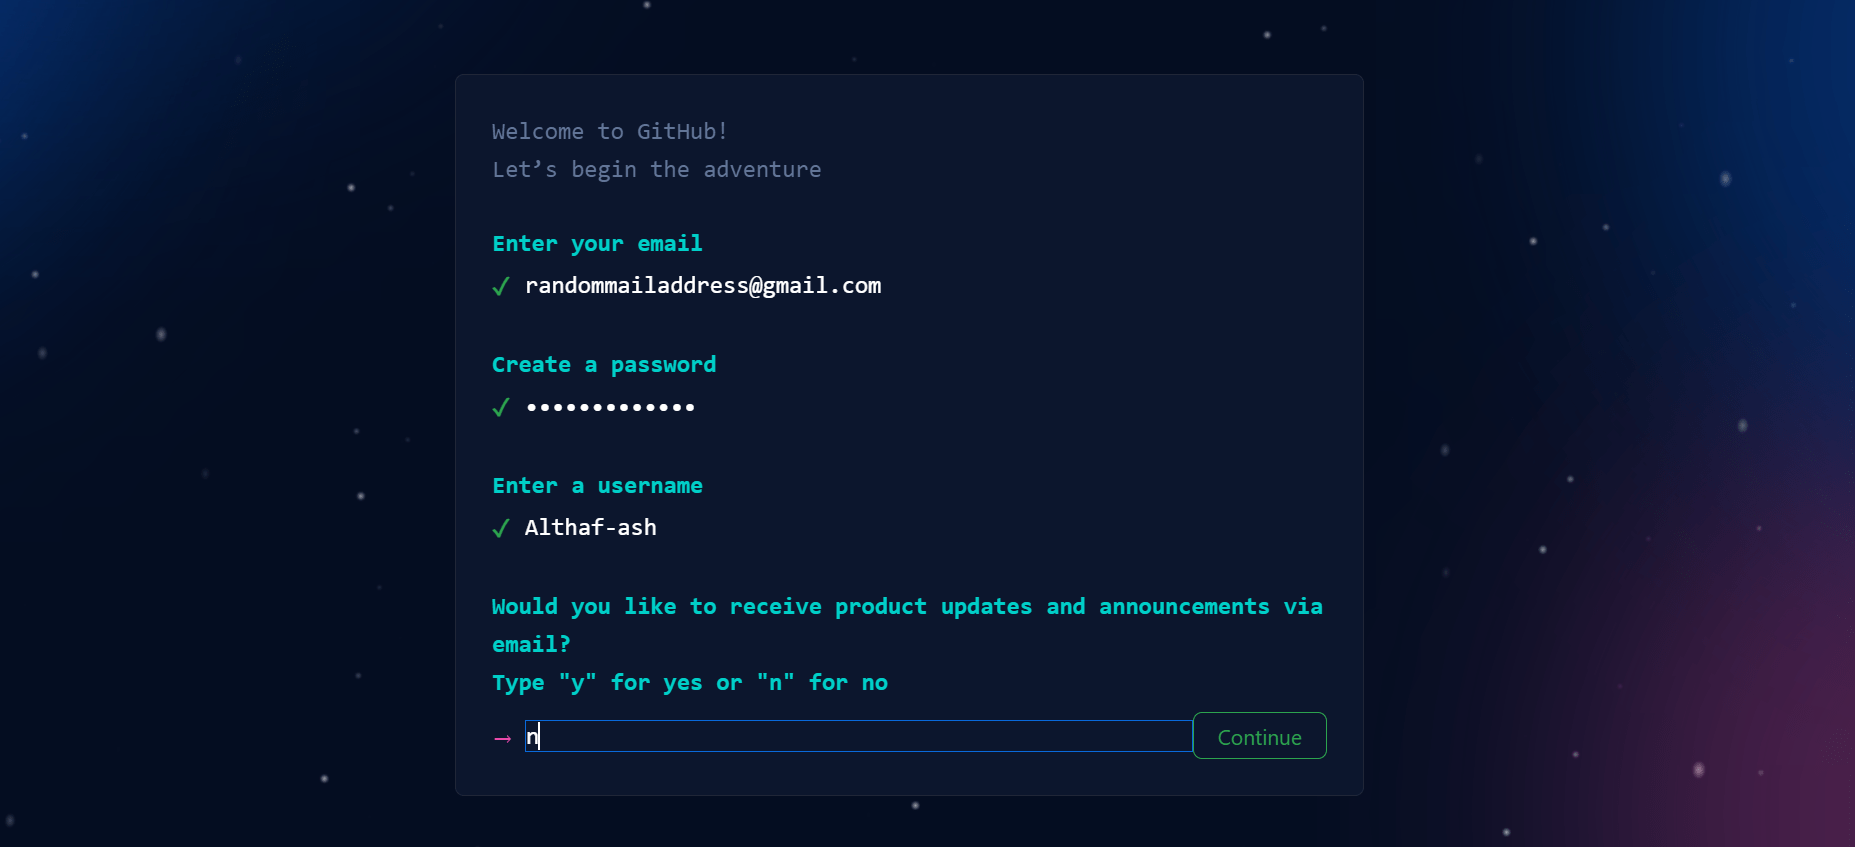
After submitting your sign-up information, an OTP (One-Time Password) will be sent to your Gmail ID. Enter the OTP provided into the designated field, and then you’ll be ready to start using your GitHub account.

Congratulations! You have successfully created your GitHub account. If you followed the steps correctly, your account should now be set up and resemble the example shown below:
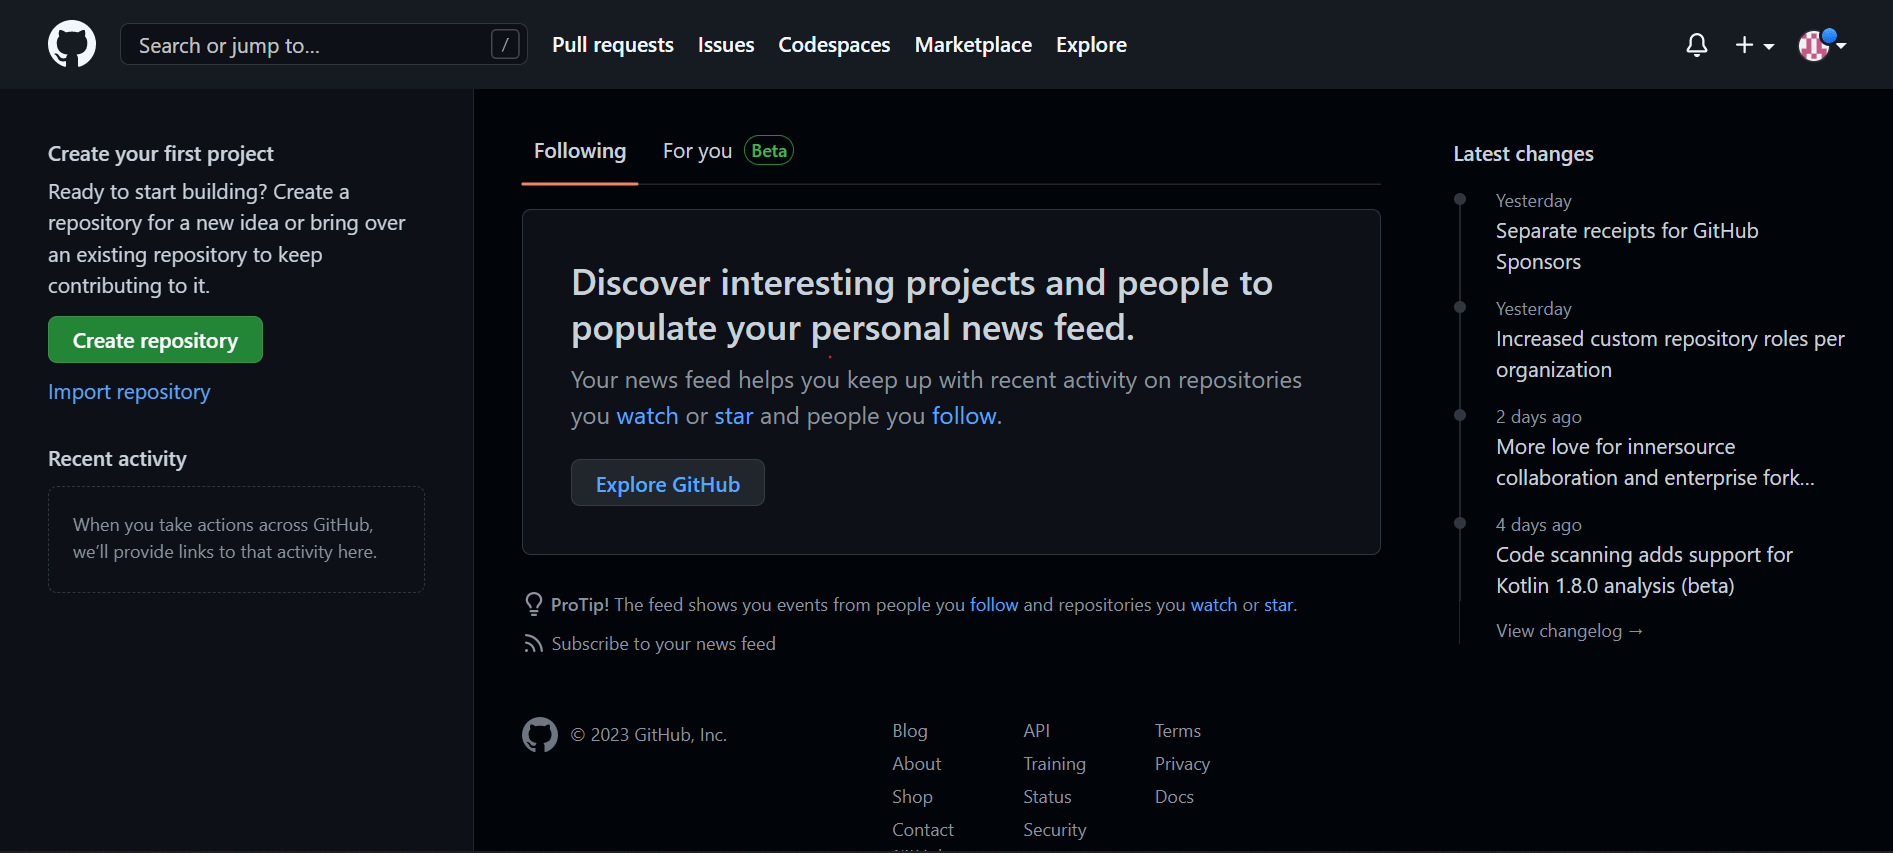
This GitHub account will be used to create a repository where you can upload your files, which we will get back to after we have installed and set up our Git account.
Now that we have set up our GitHub account, it’s time to install Git on our local device. We can use Git to share our files from our local machine to the repository we will create on GitHub. I’ll explain the steps for installing Git one by one, so just follow along.
Go to the official Git website and click on the “downloads” option for your respective operating system.

If you are using a Mac, you can click on the “macOS” option from the Downloads button. It will take you to a window as shown below:
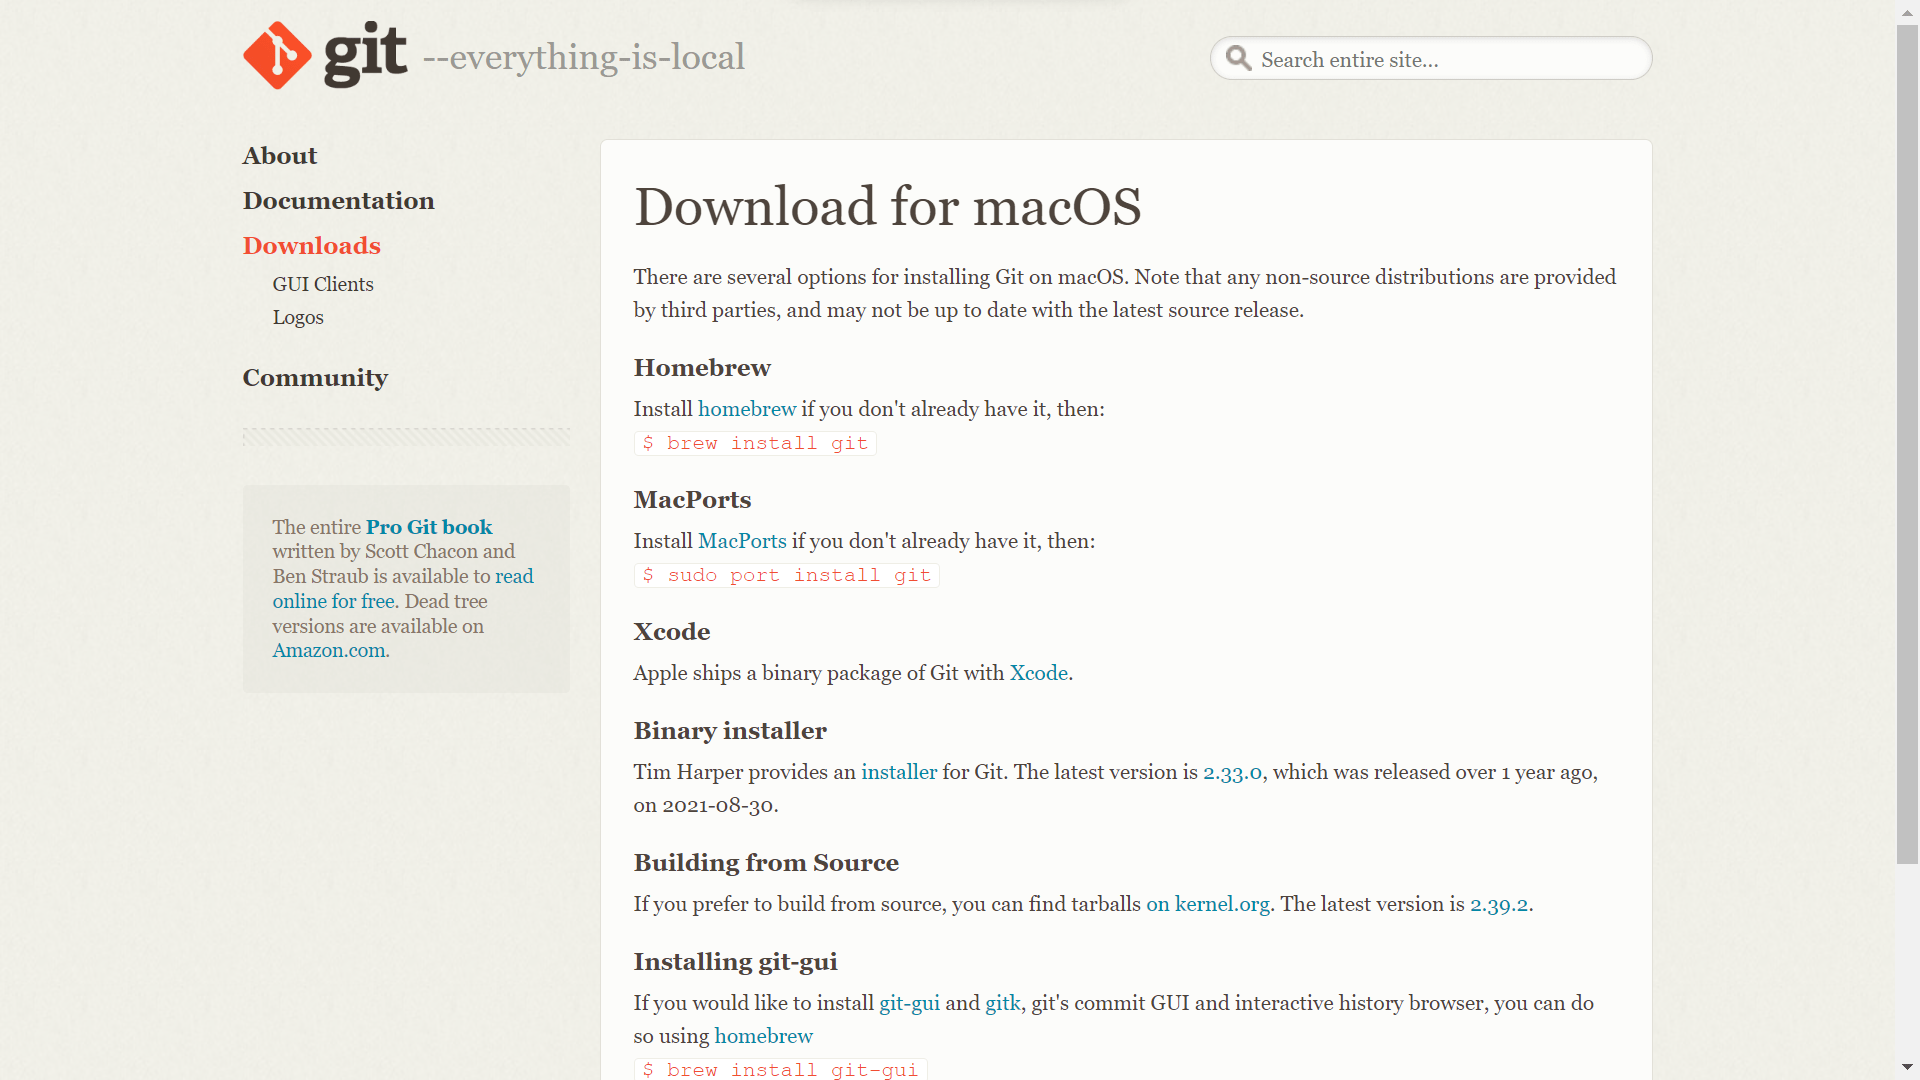
Here in this window, you can see the CLI commands that you need to install Git on your Mac system. You can copy-paste these commands into your terminal, and you are all set to go
If you get stuck somewhere or have doubts, check out this blog post, “How to Set Up Git for the First Time on macOS,” on freeCodeCamp, where our friend Joel Olawanle has done an amazing job explaining this.
If you are using Linux, you can click on the “Linux/Unix” option from the Downloads section. It will take you to a window as shown below:
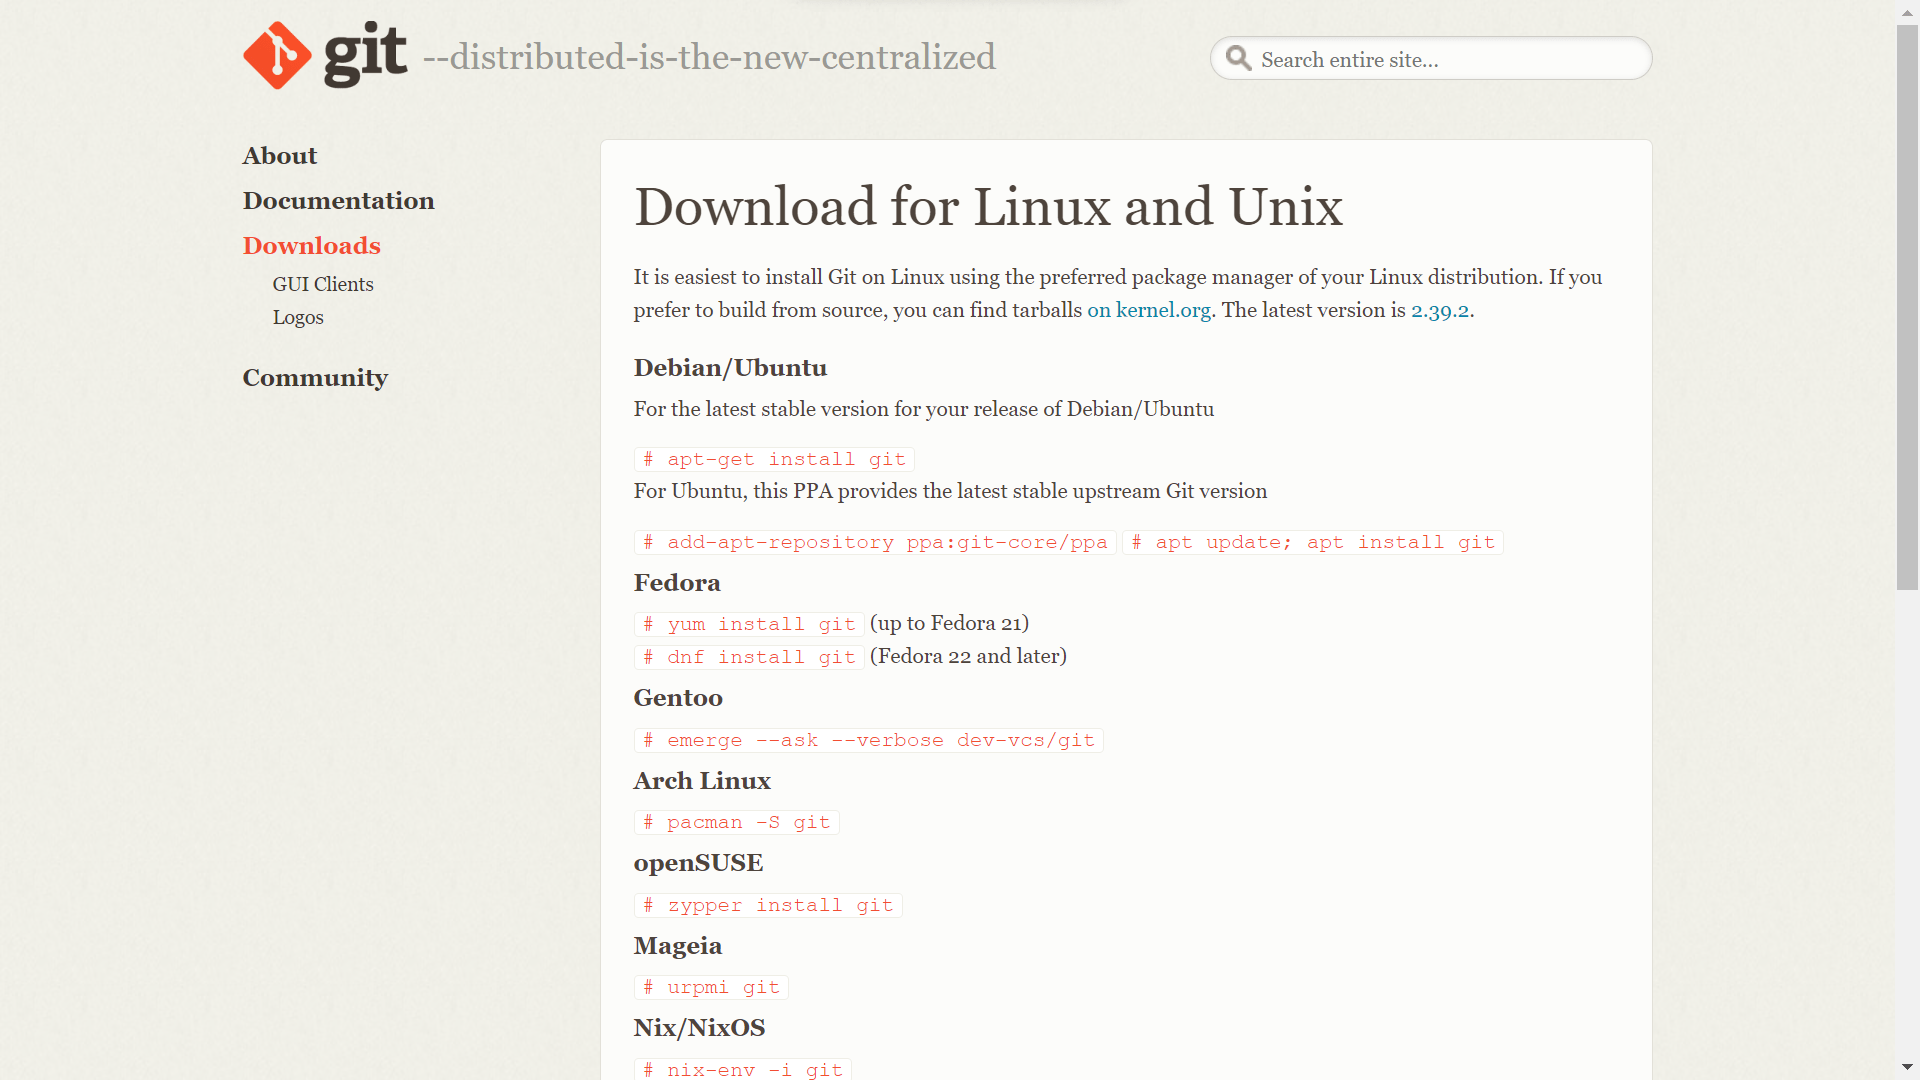
You can simply copy-paste these commands on your respective operating system’s terminal, and the system will take care of the download and installation for you, so you don’t have to worry about anything.
The best method for installing Git on Linux is to use the package manager of your Linux distribution to install Git.
For example, if you are using Ubuntu or Debian, you can use the following command in the terminal to install Git:
sudo apt-get install git
If you are using Fedora, you can use the following command:
sudo dnf install git
If you have trouble figuring something out or if you get stuck somewhere, you can check out the blog “How to Install Git on Linux” by Linuxhint where Mr John Otieno have done an amazing job at explaining how to install Git on your Linux operating system.
There are multiple ways to install Git on your Windows operating system. You can either use the Windows package manager to download and install Git, or you can manually download Git from the distributor’s website, which is the recommended method. In this explanation, I’ll be detailing the steps for manual installation.
From Step 1 click on the download option for “Windows”. When you do that, you will be directed to a similar tab that I have displayed below:
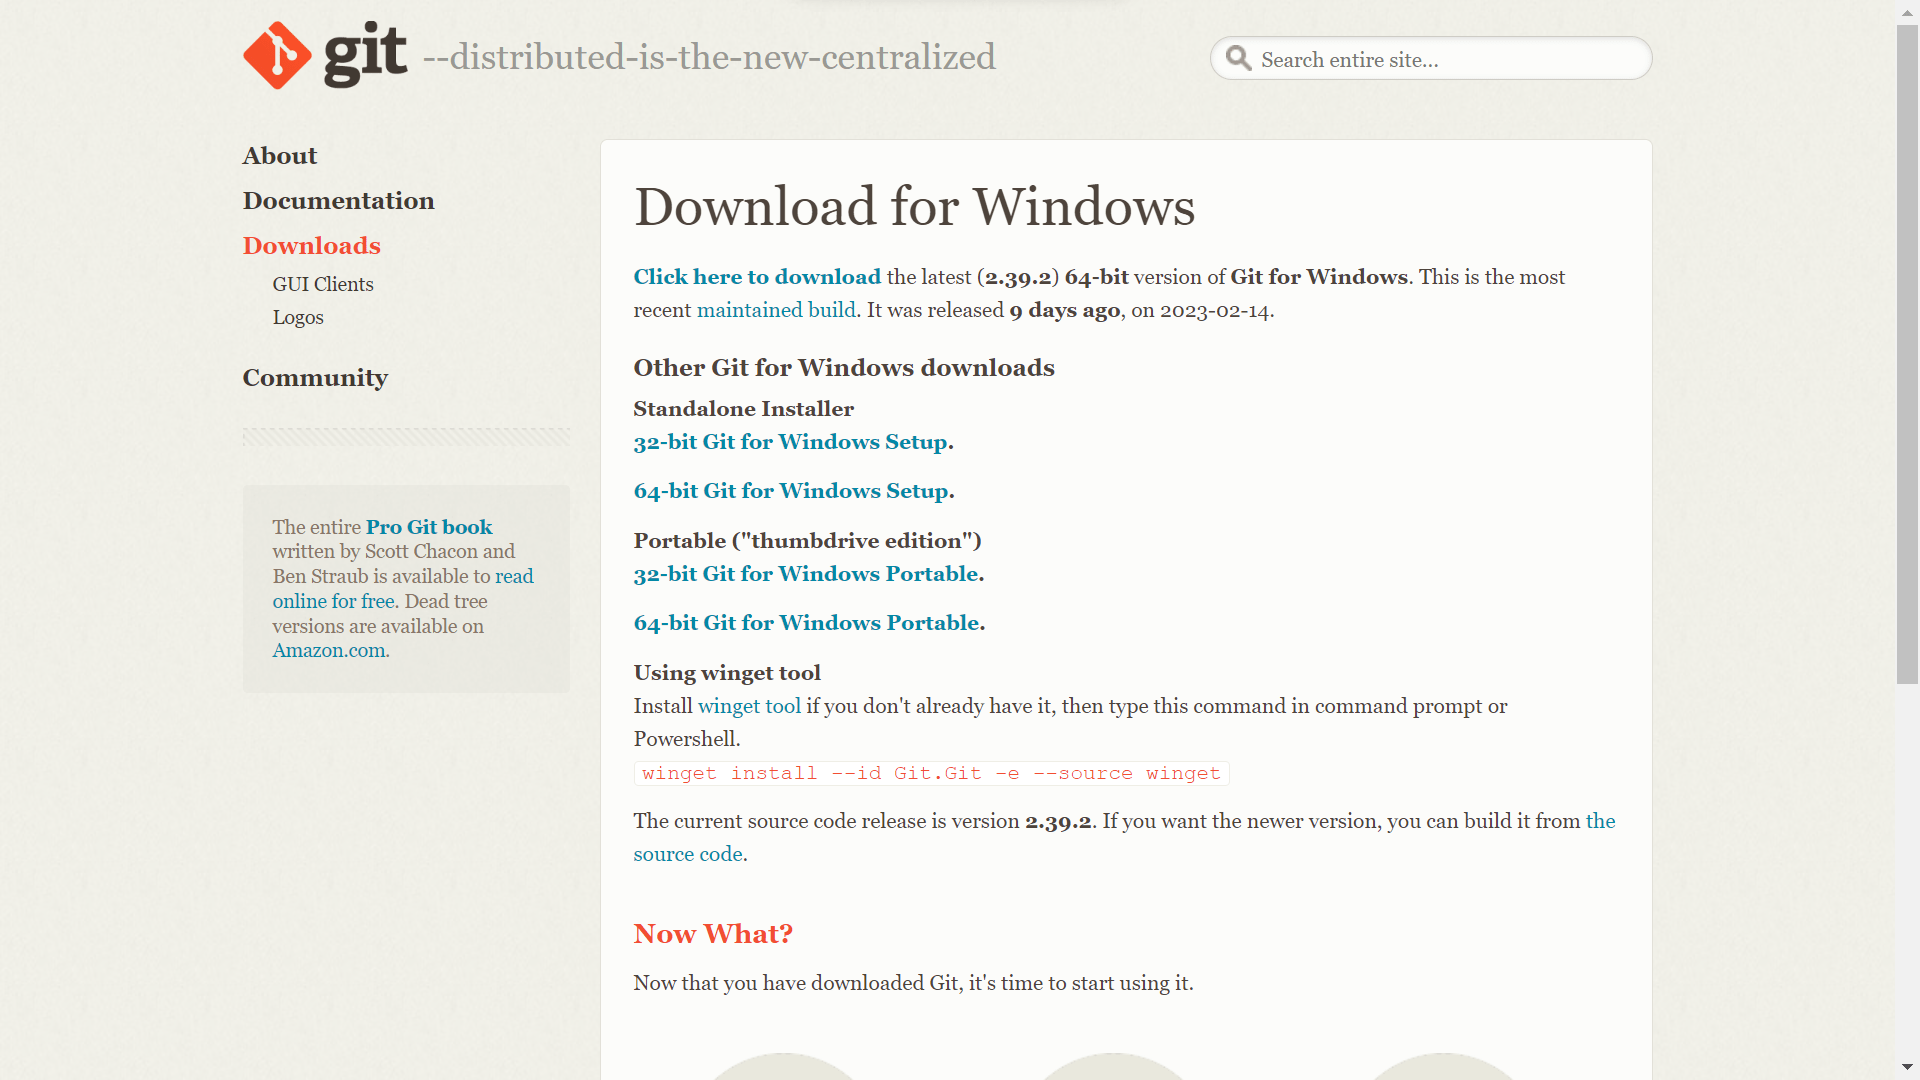
After accessing the tab, locate and click on the appropriate link for your bit size: either the ’32-bit Git for Windows Setup’ or the ’64-bit Git for Windows Setup’.
Once the download is complete, you can find the installation file in your device’s downloads folder. To begin the installation process, simply double-click on the file.
The installation process involves several verifications. Agree to all the terms and conditions, and keep all the default and recommended options as they are, especially if you’re a beginner. You don’t need to change anything right now; it can be changed later if necessary, so don’t worry about it.
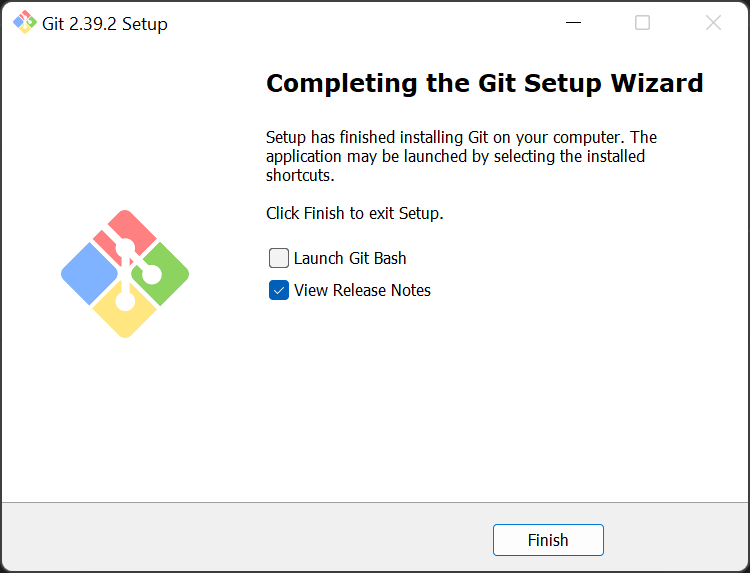
After the installation is complete, you will see a tab similar to the one shown below. Click on ‘Finish‘ to complete the installation procedure.
To verify that Git has been installed successfully on your device, open the terminal and type:
git –version
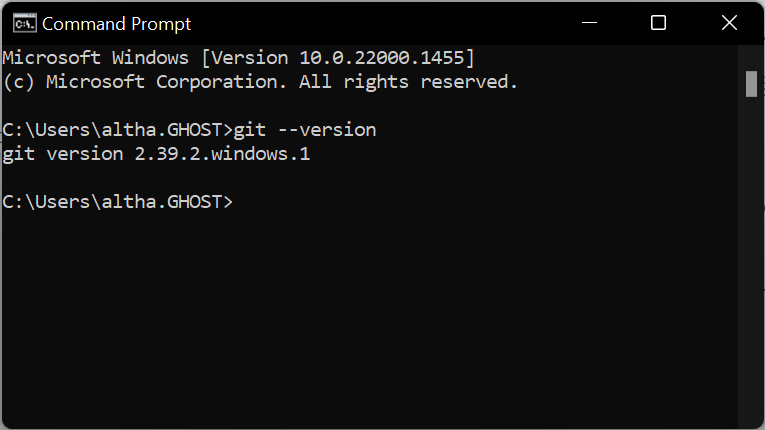
When you run this command in the terminal, it will display the version number of Git that is installed on your device.
Now that we have successfully created a GitHub account and installed Git on your device, it’s time to move on to the next step: Configuring Git with Your Name and Email Address.
Configuring Git with your name and email address is important because it allows Git to track who made changes to the code in a Git repository. By setting your name and email address, you can be identified as the author of the changes you make to the repository. This information is then used to track changes, resolve conflicts, and collaborate with others in the repository.
Configuring Git is a fairly simple task- you just need to follow along. For explaining the further steps, I will be using Git Bash.
From the Start menu, search and open Git Bash on your system. It should be installed along with Git
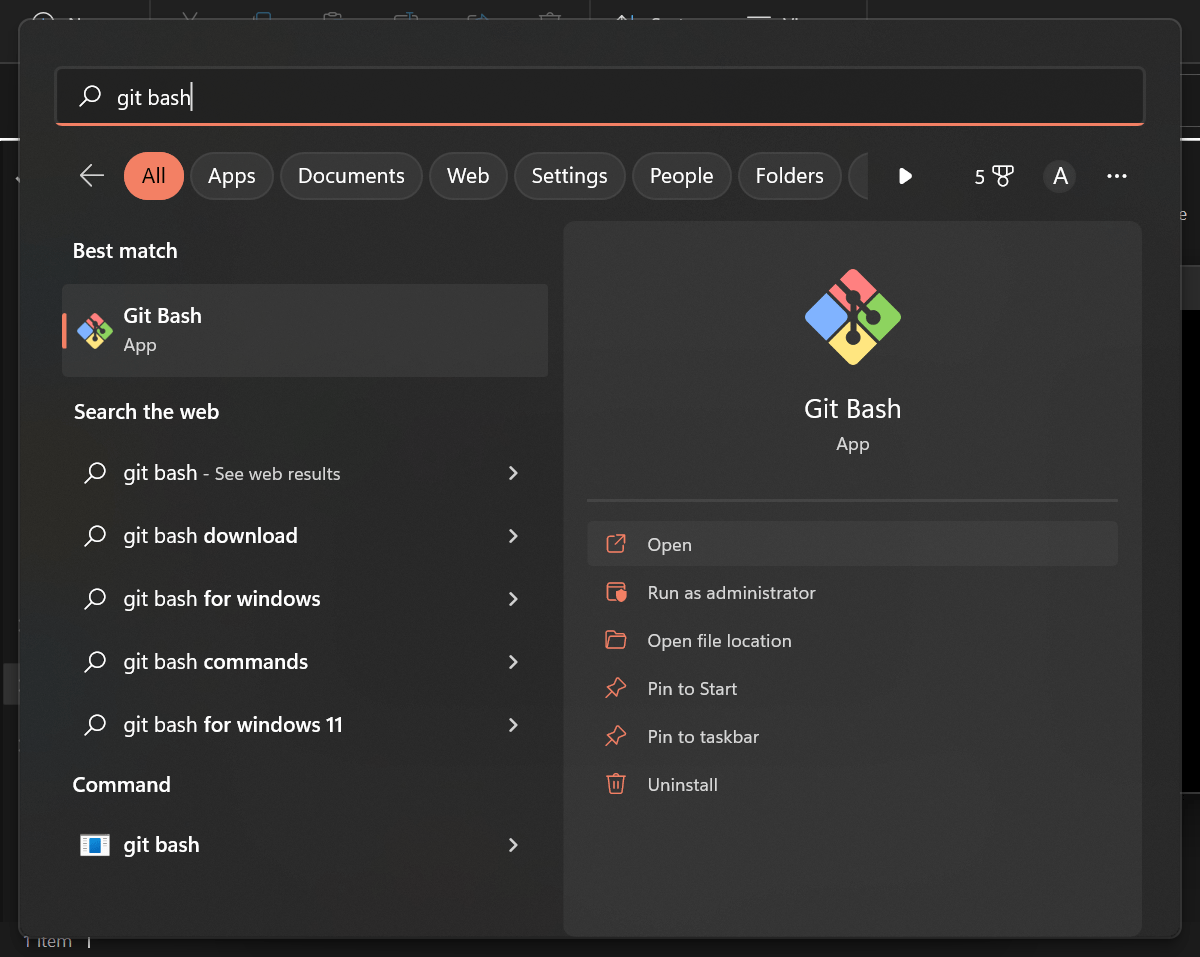
When you press ‘Open’, a command-line terminal will appear on your system. That, my friends, is the all-mighty Git Bash – the platform that we will be using for our further explanation.
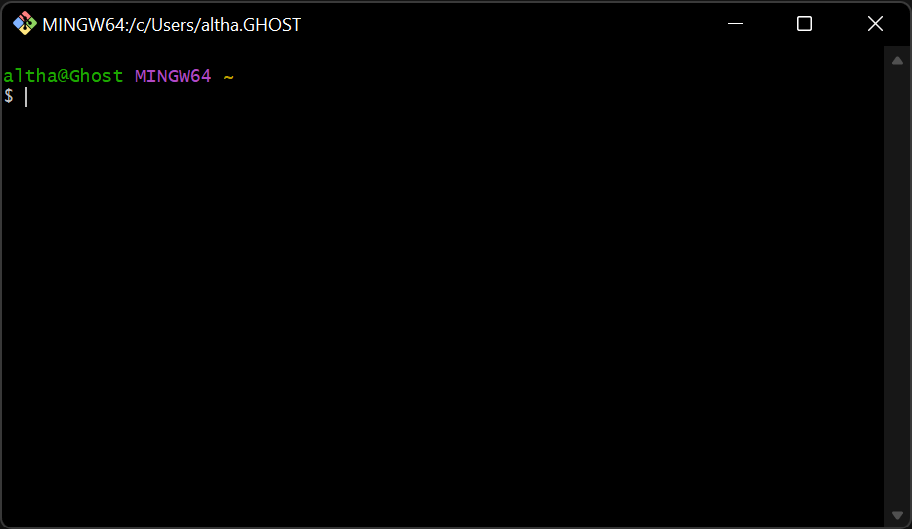
To configure Git, type in the following commands to your Git Bash, as shown below in the example:
git config –global user.name “Your Name”
git config –global user.email “Your Gmail”
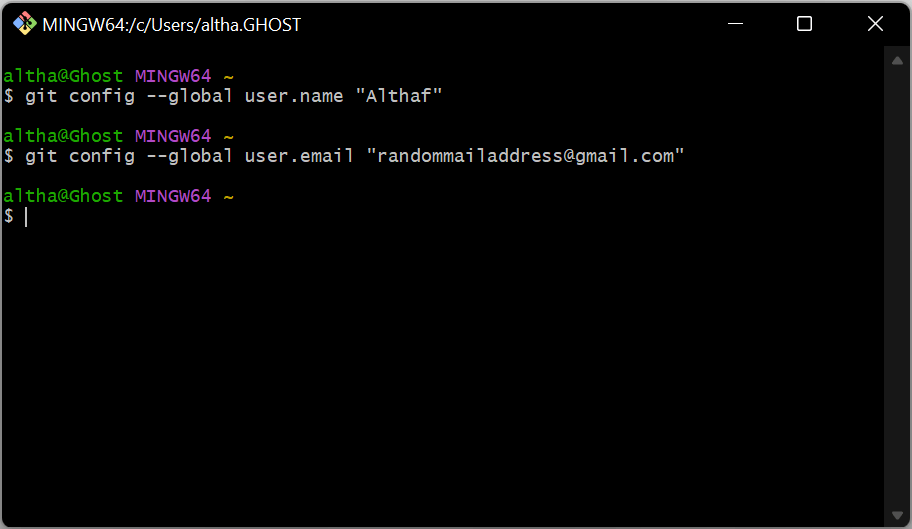
Don’t forget to press Enter to execute each command.
That’s it! You have now successfully configured Git with your name and email address. You only need to do this configuration once, and Git will remember these details for all future commits.
Alright folks, now that we have configured our Git, it is time for us to initialize a local repository using Git.
A local repository is a Git repository that is stored on your local computer or device. It contains all the files and directories for your project, along with the commit history and version control information. You can use the local repository to track changes, revert to previous versions of your project, and collaborate with others by pushing changes to a remote repository.
To initialize a directory as a Git repository, you must first locate the folder or directory on your local machine. This can be done using the command line or file explorer, depending on your preference and familiarity with each method.
For your reference, in the below example, I have created a folder that contains a Python file, which I will be initializing as a Git repository. This is just an example, and you can initialize any directory or folder as a Git repository by following the same steps.
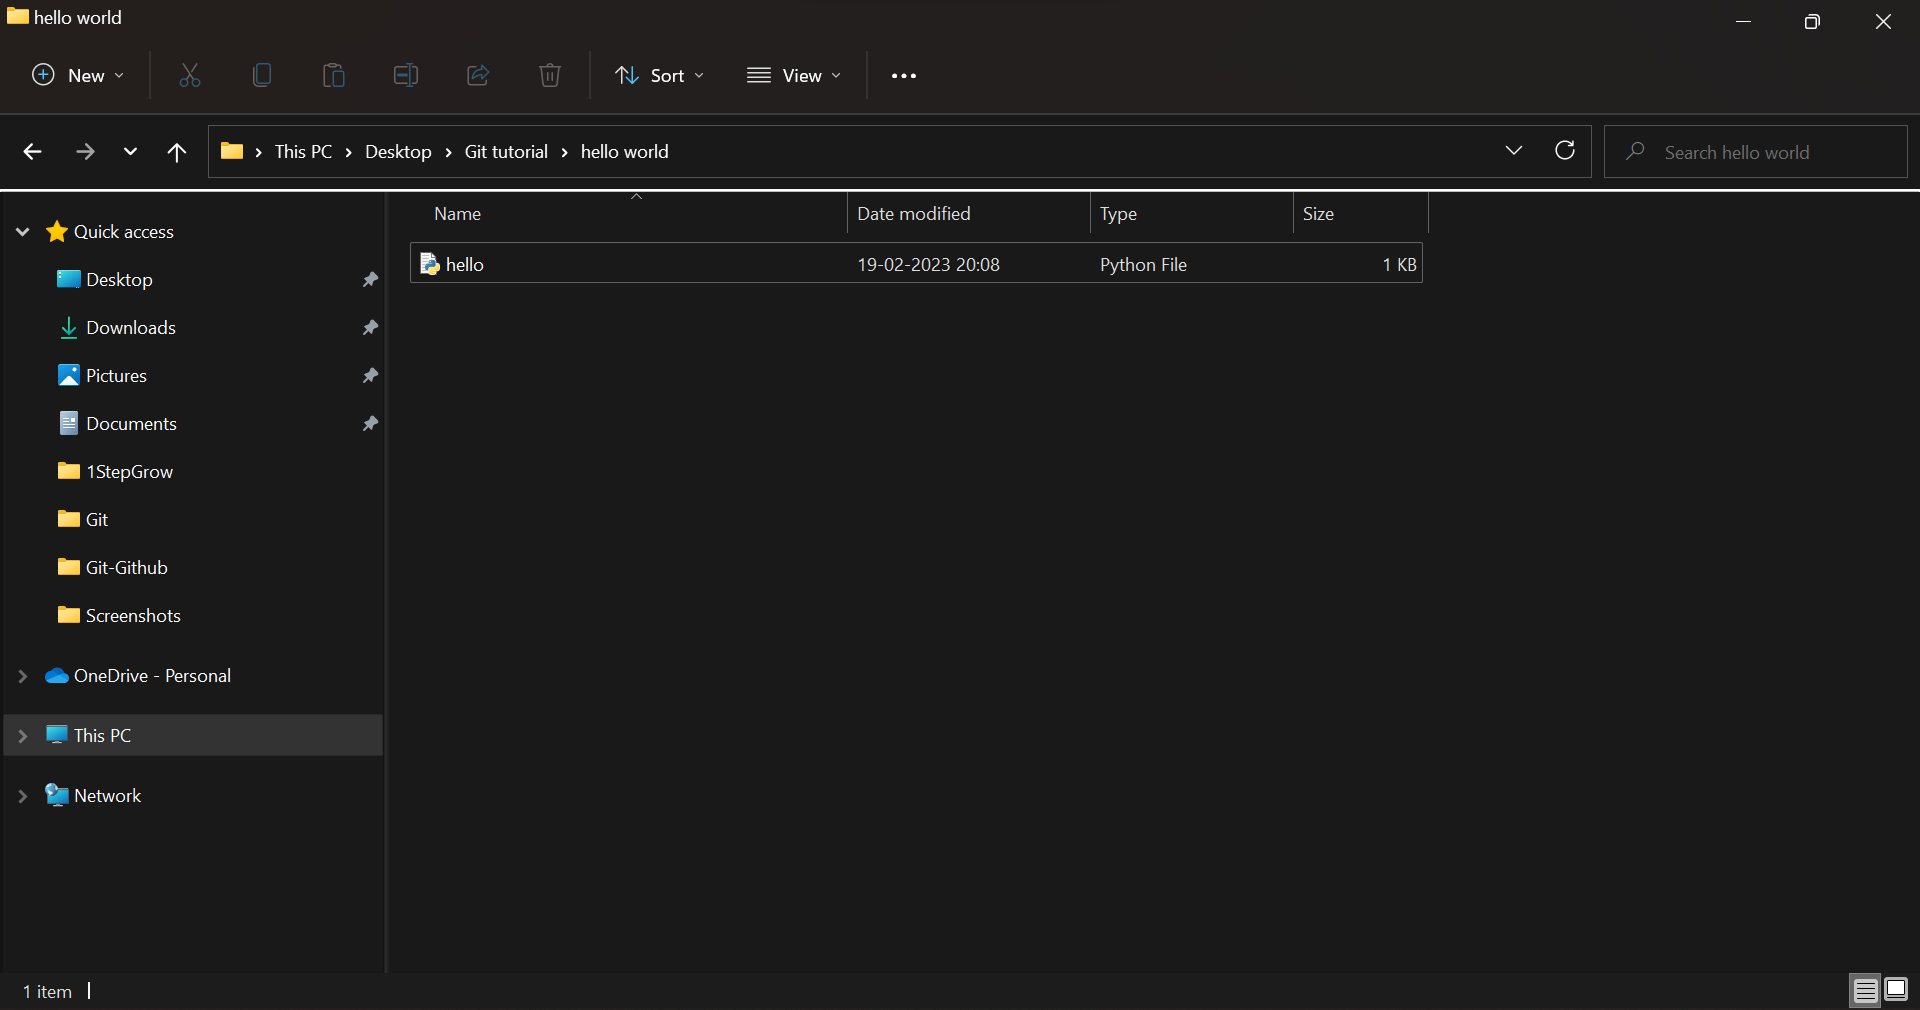
Before we initialize the repository using Git, we will have to change our current working directory in Git Bash to the folder in which we want to initiate the repository. To do that, please follow the steps below:
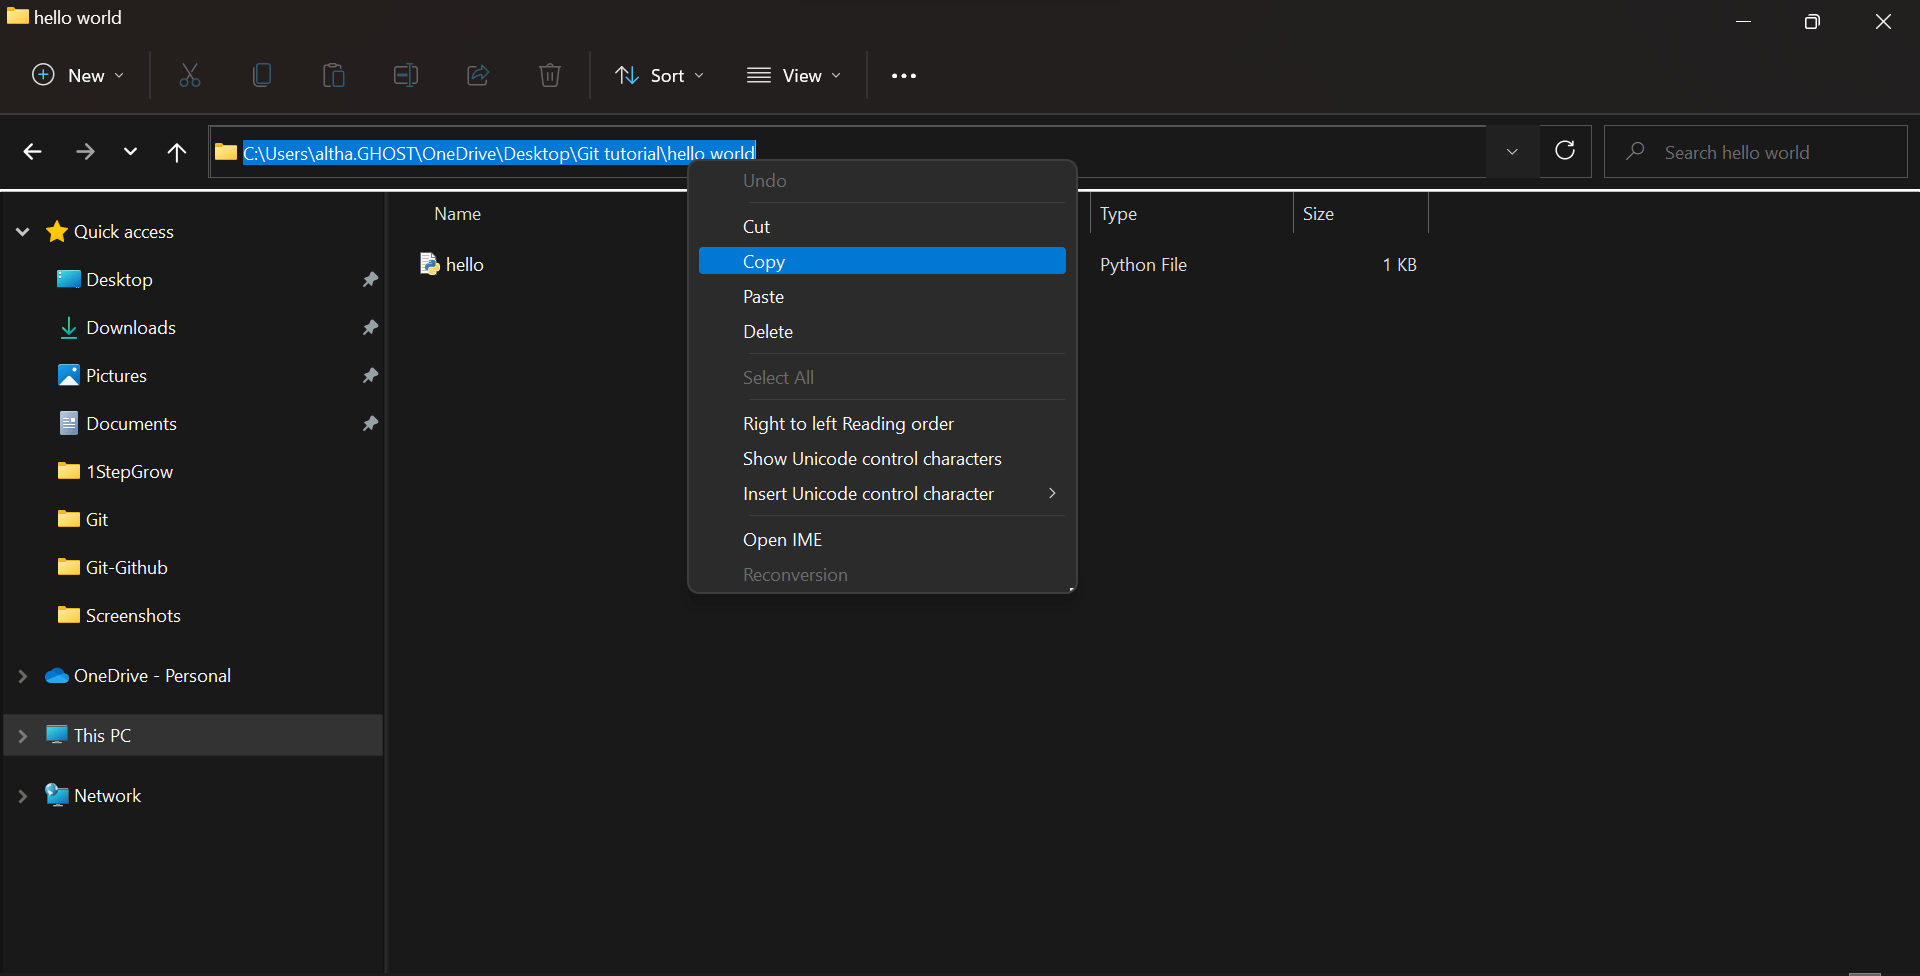
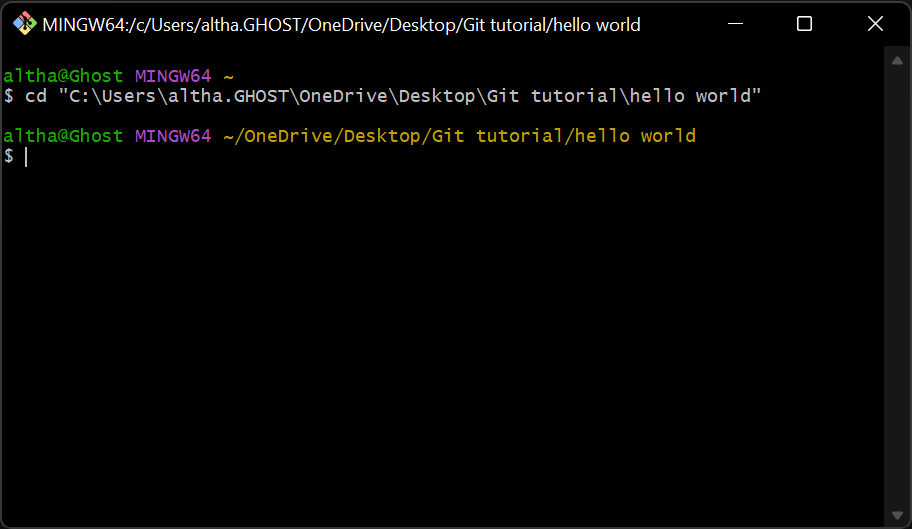
When you paste the path in Git Bash, make sure to enclose it within double quotes, otherwise you might encounter errors. The correct format to paste the path is as follows:
cd “path/to/directory”
By enclosing the path within double quotes, you ensure that the entire path is treated as a single argument to the cd command, even if it contains spaces or other special characters.
To initiate a local repository in the folder or directory you have navigated to, you can use the git init command in Git Bash. This command creates a new Git repository in the current directory and initializes it with a .git subdirectory that contains all the necessary files and folders for version control.
git init
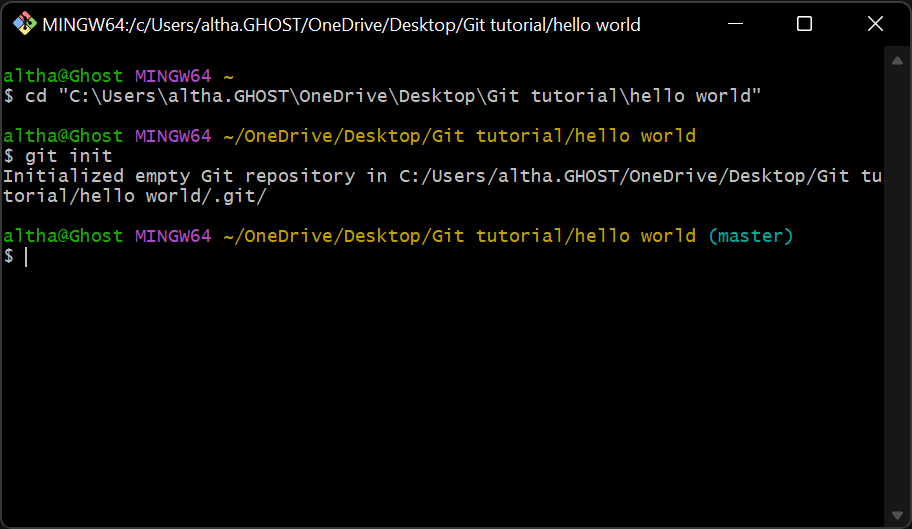
When you make changes to a file in your working directory, Git does not track those changes until you add them to the staging area using git add.
The staging area is a temporary holding area in Git where you can add changes that you want to include in the next commit. Once you have added changes to the staging area using git add, you can review them and make sure they are what you want to commit.
To summarize, git add is used to add changes to the staging area, and the staging area is used to prepare changes for a commit.
To add changes to the staging area using git add, you can use the following command:
git add <filename>
This command adds the changes made to the specified file to the staging area. If you want to add changes to all files in the working directory, you can use the following command instead:
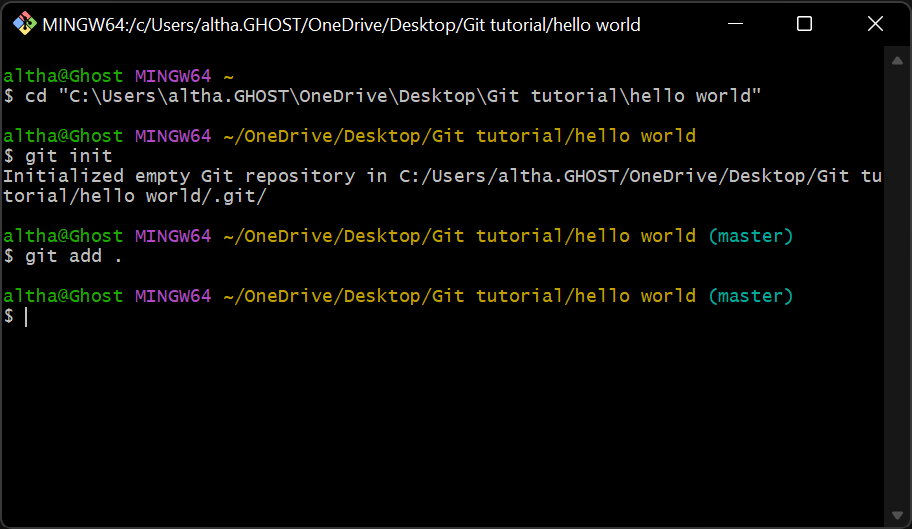
git add .
In the following example I have used “git add .” to add my file to the staging area.
A commit is a snapshot of the changes made to the files in the repository at a particular point in time. Each commit has a unique identifier that can be used to reference it later.
‘git commit’ is a command in Git that is used to create a new commit in the local repository
To create a new commit using ‘git commit’, you need to provide a commit message that briefly describes the changes you have made. The commit message is a way to document the changes you have made and to provide context for other users who may be reviewing your code.
You can specify a commit message using the ‘-m’ flag followed by a brief description of the changes.
Here is an example of how to create a new commit with a commit message:
git commit -m “Add new feature to app”
I am now going to commit the changes made to our file to the local repository, as demonstrated above. Once you have completed this task, your output should resemble the example shown below.
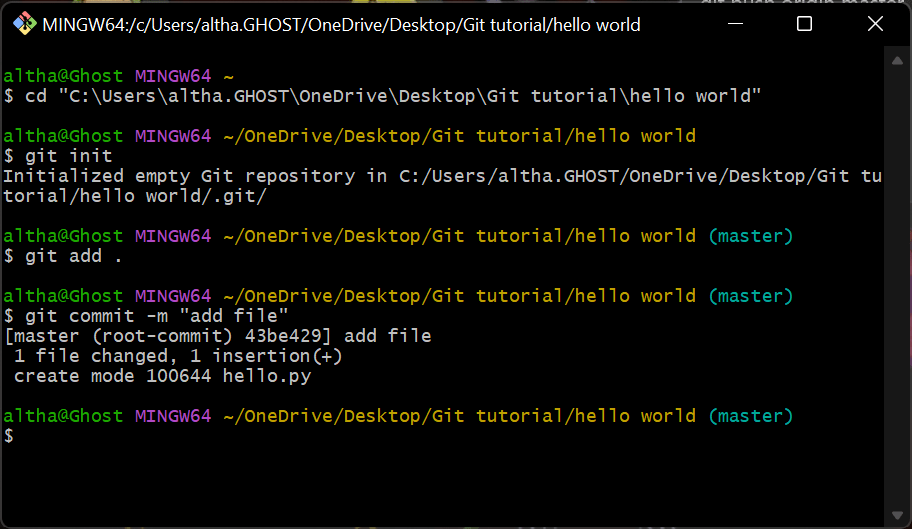
Once you have created a new commit, it is saved to the local repository and can be viewed using the ‘git log’ command. Commits can be pushed to a remote repository to share your changes with others and collaborate on a project.
Alright everyone, with that, we have completed our work on the local repository. Now, let’s create a remote repository in GitHub and push our file from the local repository to the remote repository.
In this section, I am going to demonstrate how to create a remote repository on the GitHub account that we created at the beginning of this blog. However, before we dive in, let’s briefly discuss what a remote repository is.
A remote repository is a repository that is hosted on a remote server, such as GitHub or GitLab. It is used to store the codebase and version history of a project, just like a local repository. The main difference is that a remote repository can be accessed and shared by multiple developers from different locations, making it an essential tool for collaborating on software projects.
Creating a remote repository is a fairly simple task. Just follow the steps below:
Go to your GitHub profile that we have created earlier
When you open your GitHub profile in your browser, you will be directed to a landing page similar to the one shown below.

Click on the ‘create repository’ button
Upon clicking the ‘Create repository’ button, you will be directed to a window similar to the one shown below. Here, add your repository name (I have chosen the suggested name by GitHub) and leave all other options as they are. You do not need to change anything. Finally, click on the ‘Create repository‘ button to create your remote repository.

Voila! You have successfully created your remote repository.
If you have followed the steps properly, you should now have a repository created on your GitHub account. It should look something like this:
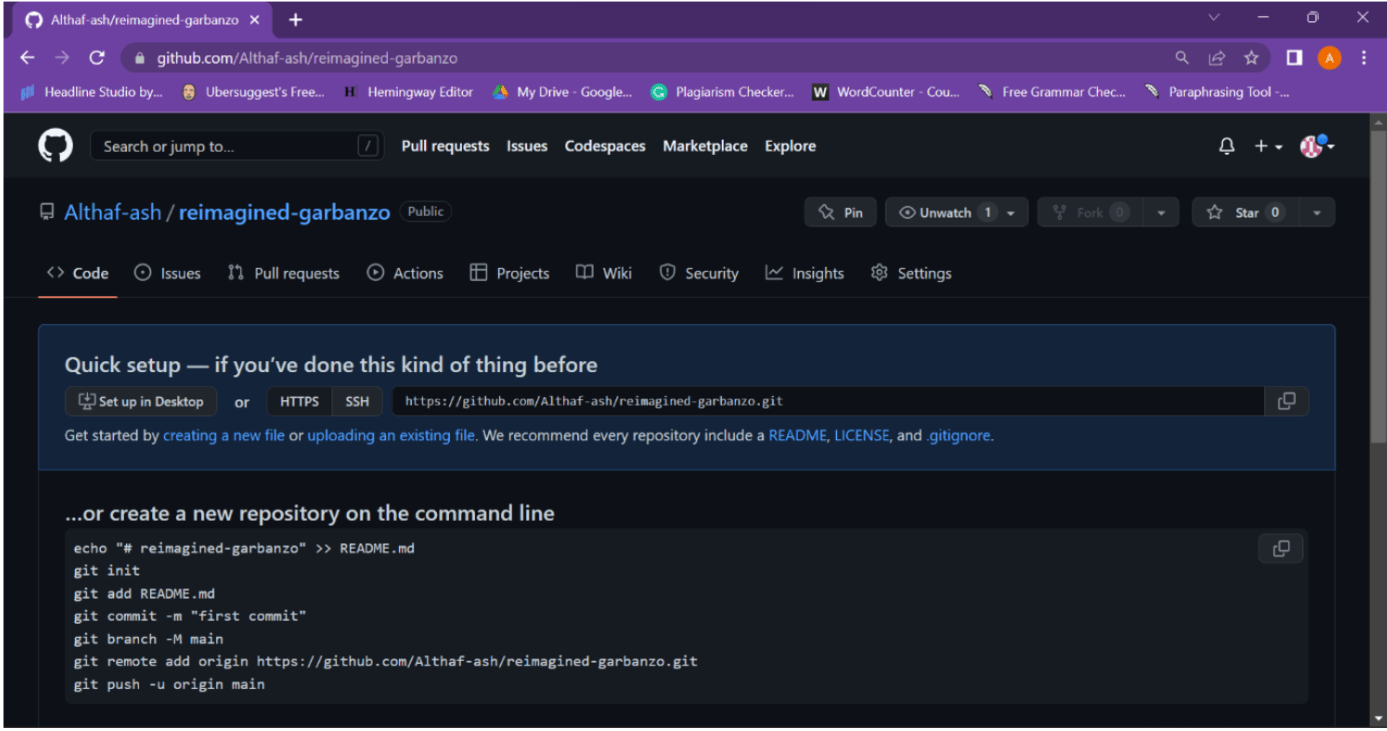
Alright everyone, it’s time for us to connect our local repository with the remote repository and add the files that we have committed on our local repository to our remote repository.
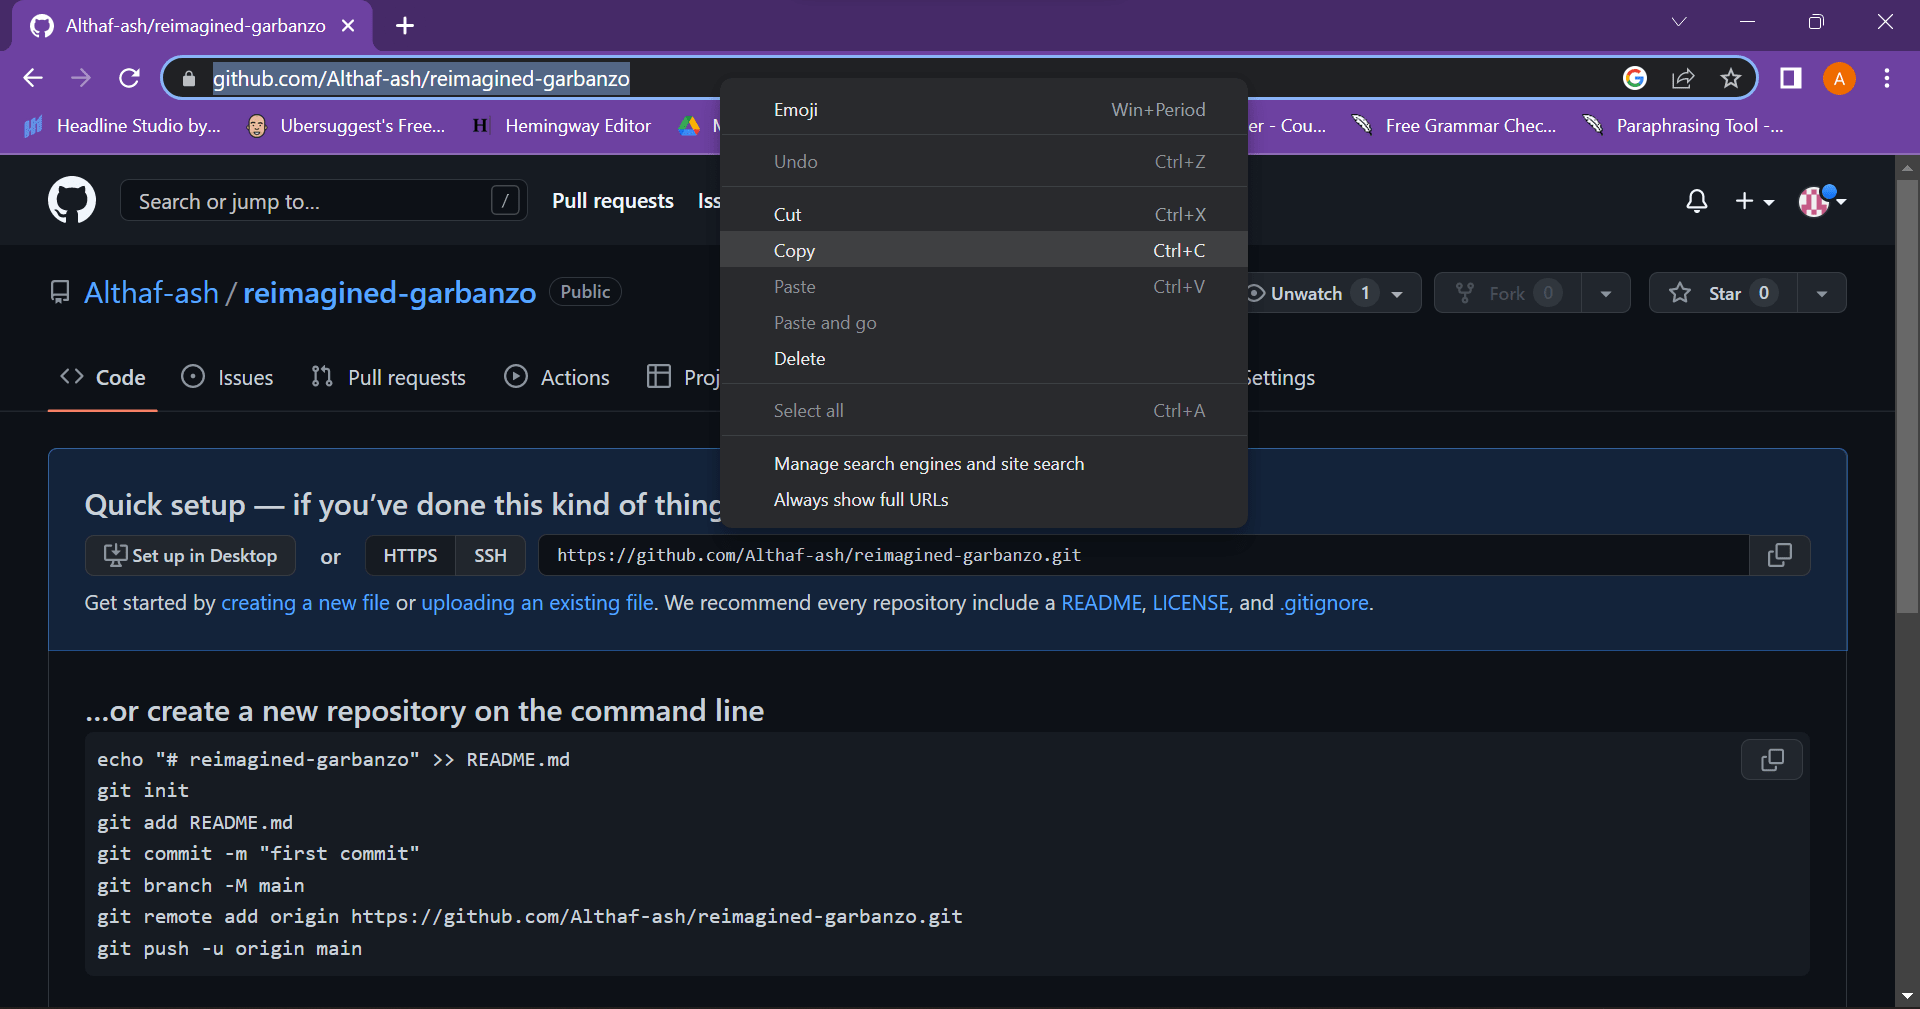
Copy the URL link from your GitHub remote repository.
To upload our file to the remote repository, we need to first copy the URL link of our remote repository from our GitHub account as shown below:
Open your Git Bash on the local repository that we have created
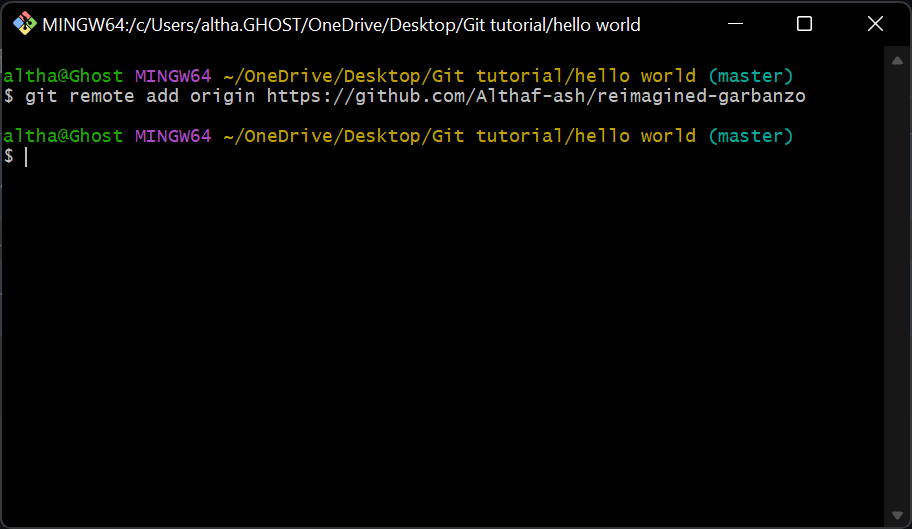
After opening your Git Bash type in the following command:
git remote add origin <URL>
Replace <URL> with the link that we copied earlier from GitHub.
The git remote add command is used to add a new remote repository to your local Git repository. In this case, we are adding the remote repository that we created on GitHub. The origin parameter is used to give a name to the remote repository, which is commonly referred to as origin. By running this command, we are essentially telling Git to associate our local repository with the remote repository located at the provided URL. This allows us to push and pull changes between our local and remote repositories.
Push the file from the local repository to the remote repository
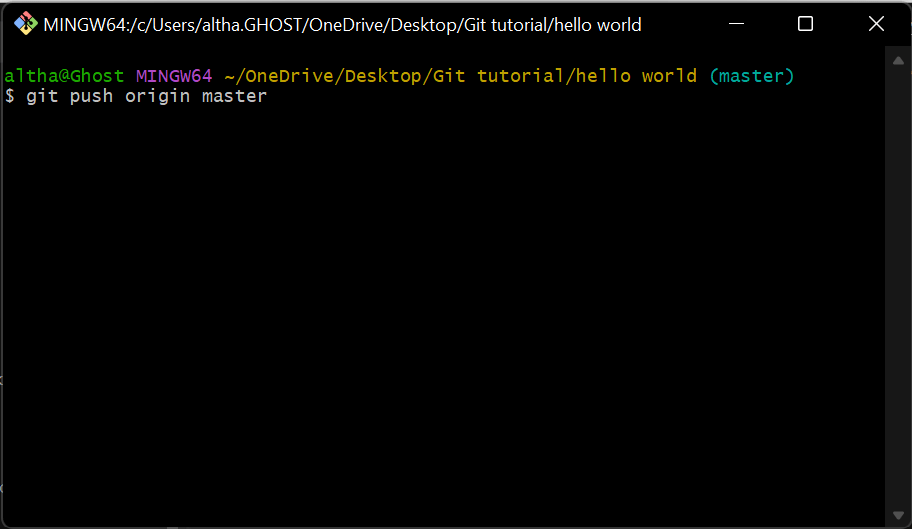
Now that we have connected our local and remote repositories, we can push our local repository changes to the remote repository using the following command in Git Bash:
git push origin master
Here, git push is the command used to upload local repository content to a remote repository, origin is the name given to the remote repository. master is the name of the branch on the remote repository that we want to push our changes to.
Once you type in the command to your Git Bash terminal and press enter proceed to step 4
Complete the authentication procedure
After executing this command, Git Bash will ask for your GitHub username and password. Once the authentication is completed, your changes will be pushed to the remote repository.
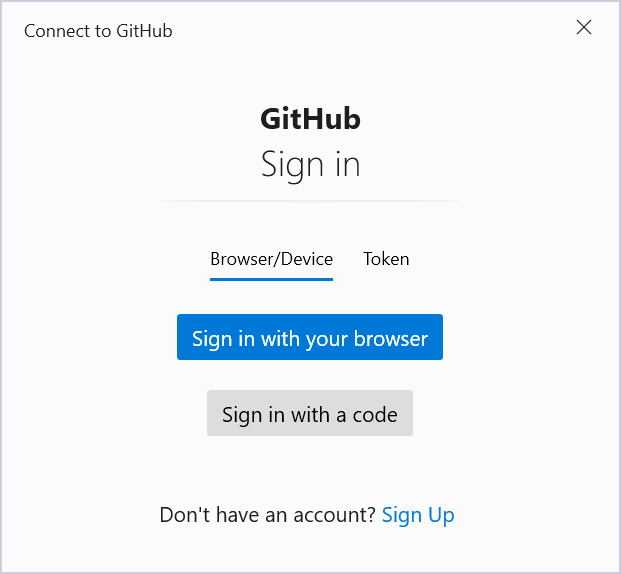

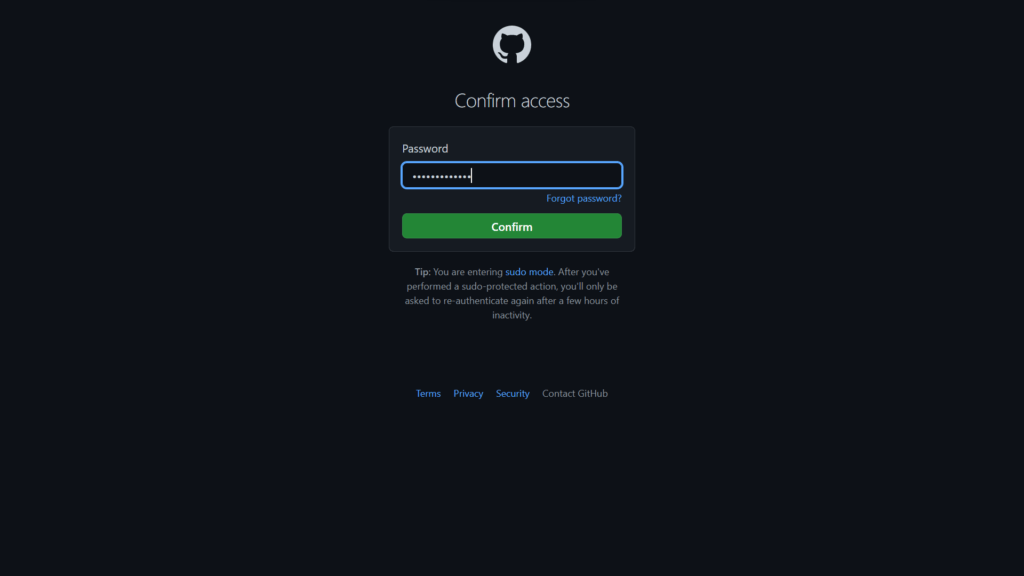
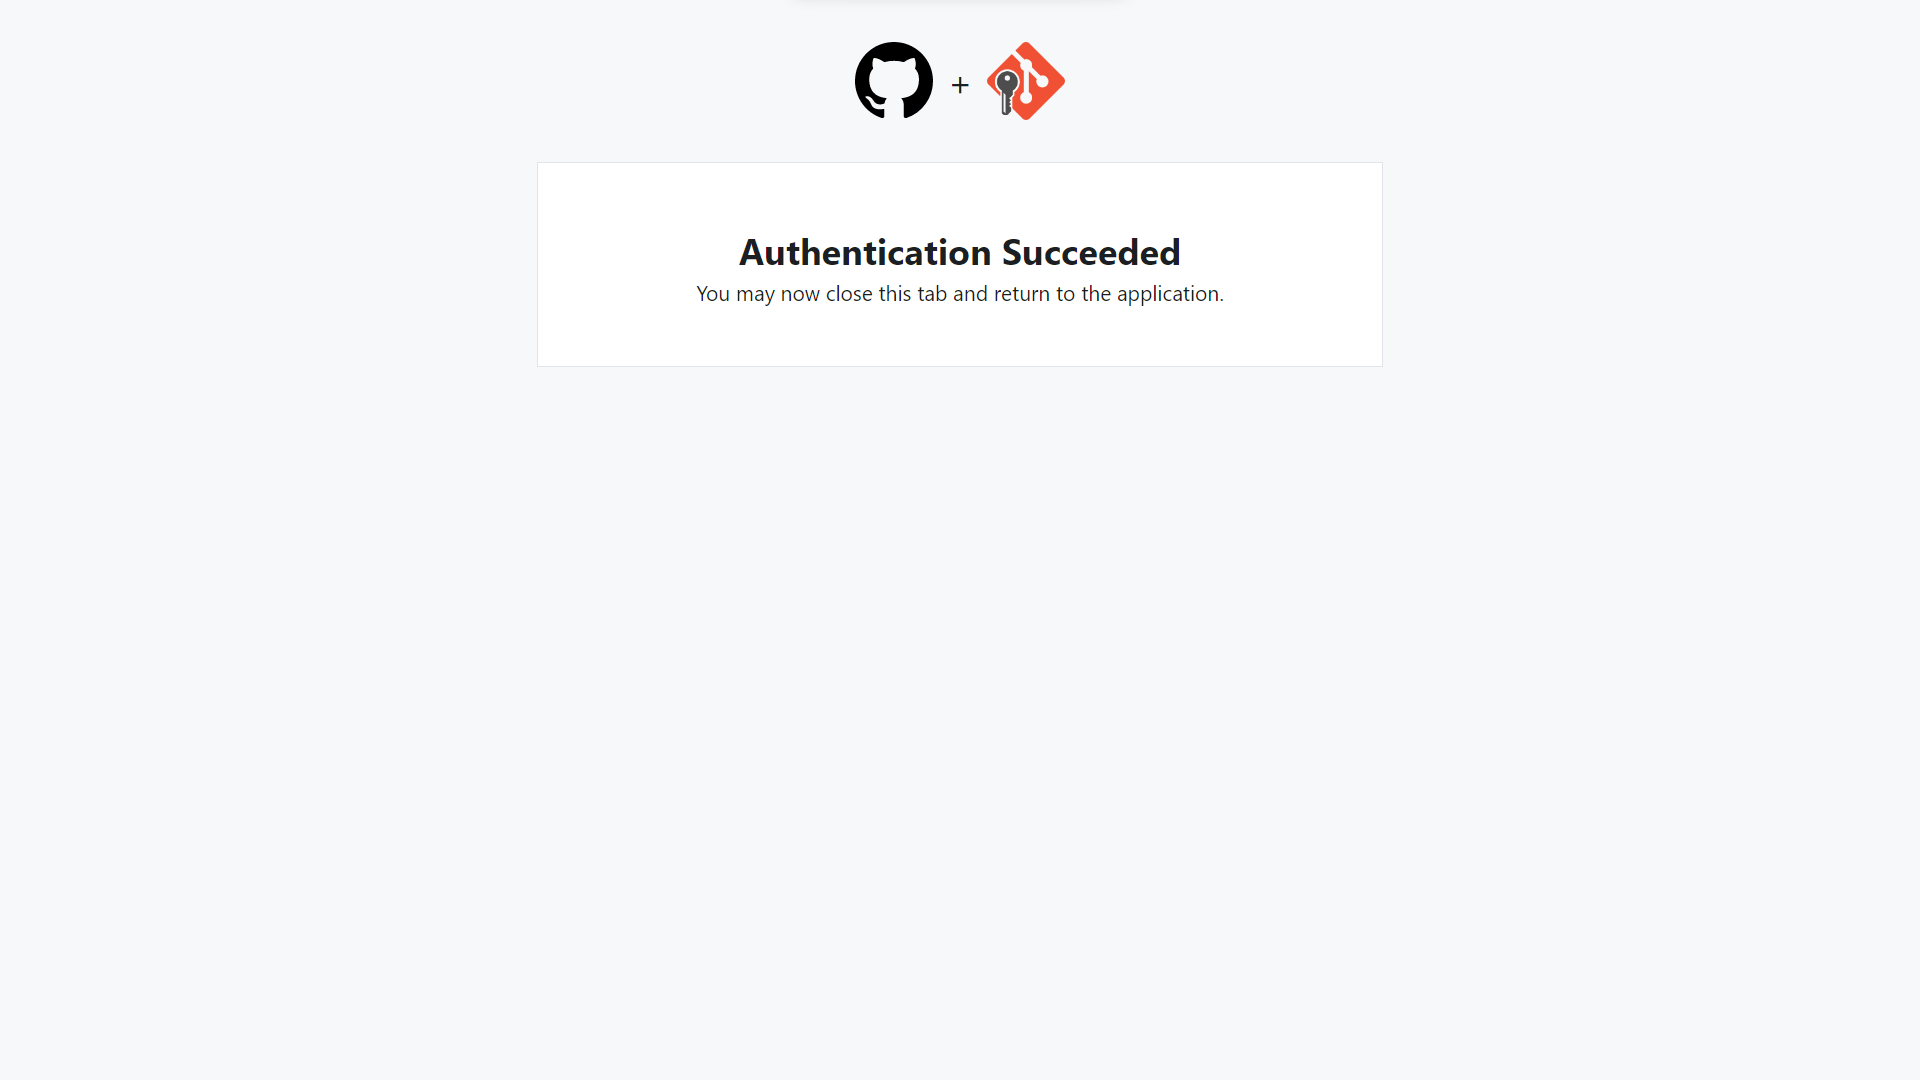
Alright guys, now we are coming to the conclusion of this section, once the push is complete, check your GitHub repository to confirm that the file has been successfully pushed.
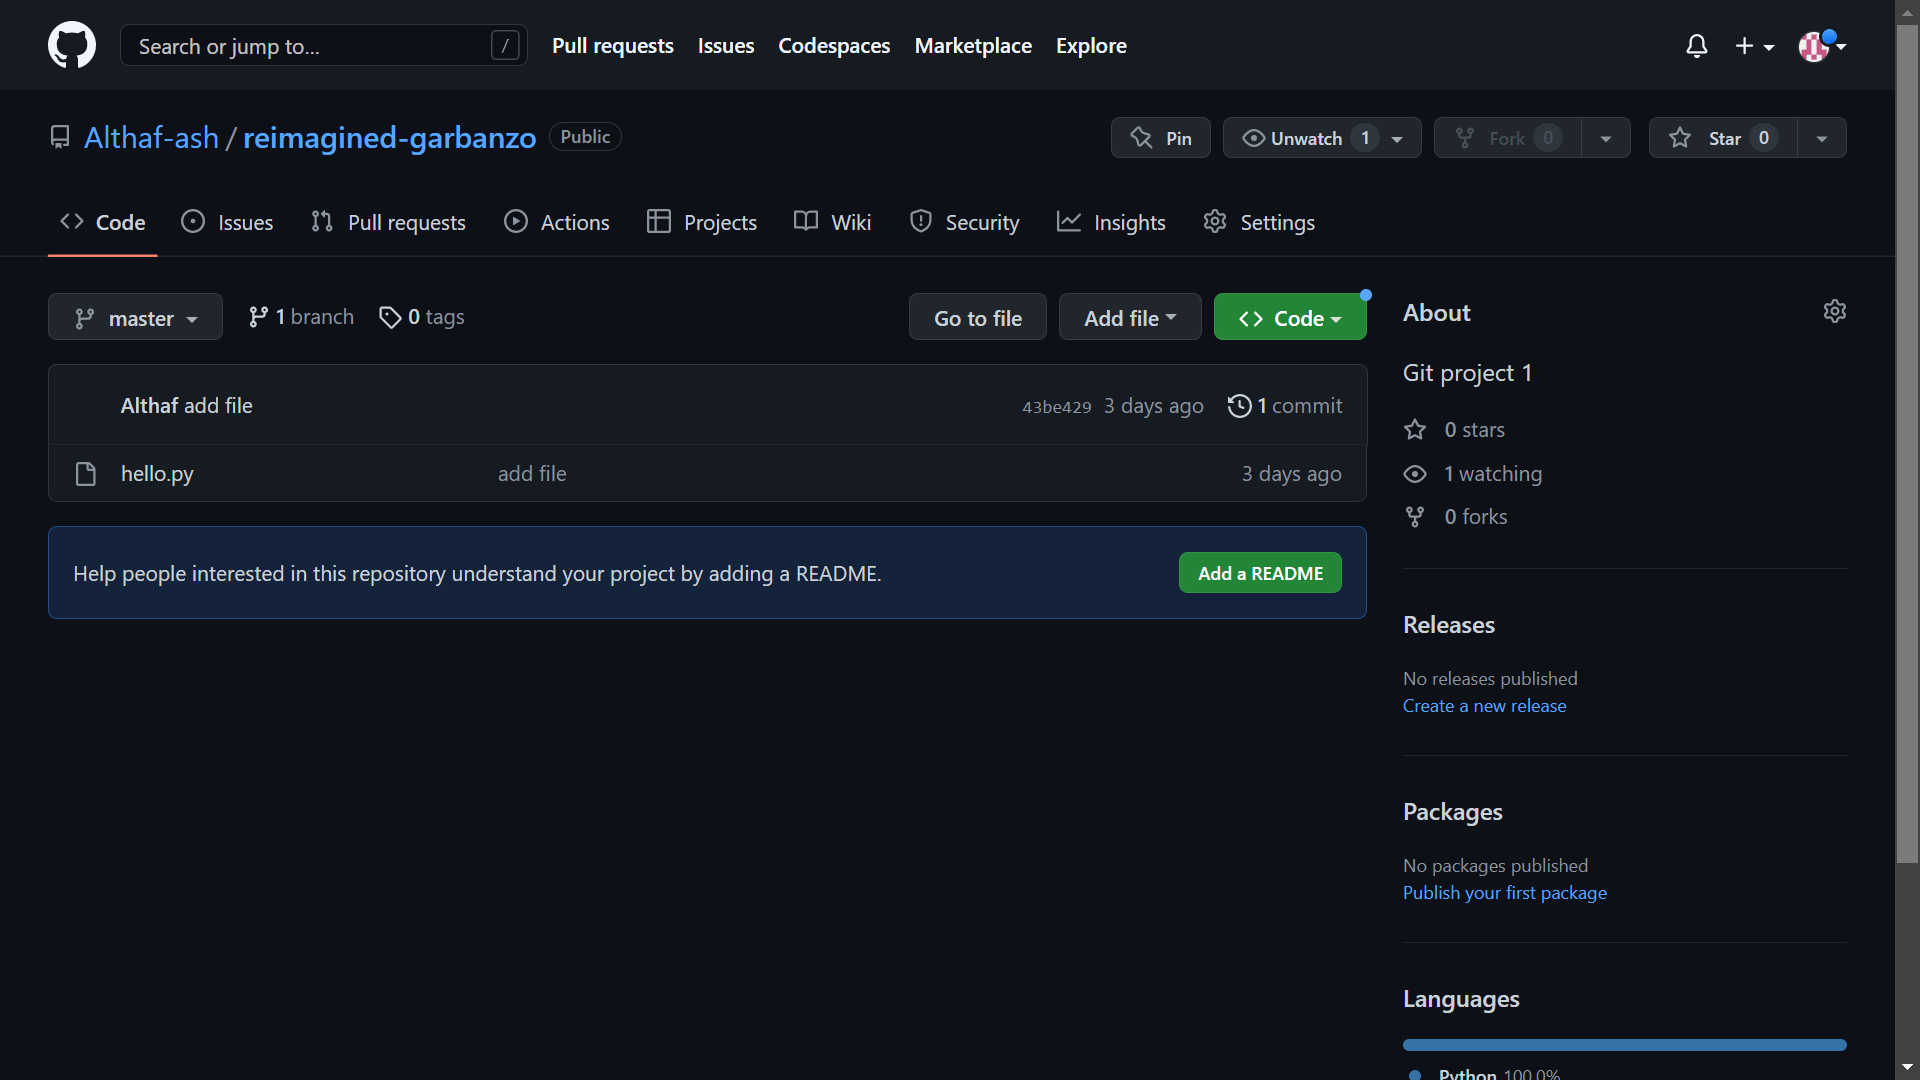
You can see here that file, ‘hello.py’ has been added to the GitHub repository.
Now, I’ll show you how to get a folder or file from GitHub onto your personal computer. This process is called “cloning a remote repository“. Before we dive in, let’s take a minute to answer the question:
cloning refers to the process of creating a local copy of a remote repository on your personal computer.
Now let us see with an example how you can perform cloning on your device.
Create a folder into which you want to clone the file from GitHub
I’ve created a folder called ‘clone’ on my local desktop, and I’ve copied its path, as shown below, because we’ll need it in the next step:
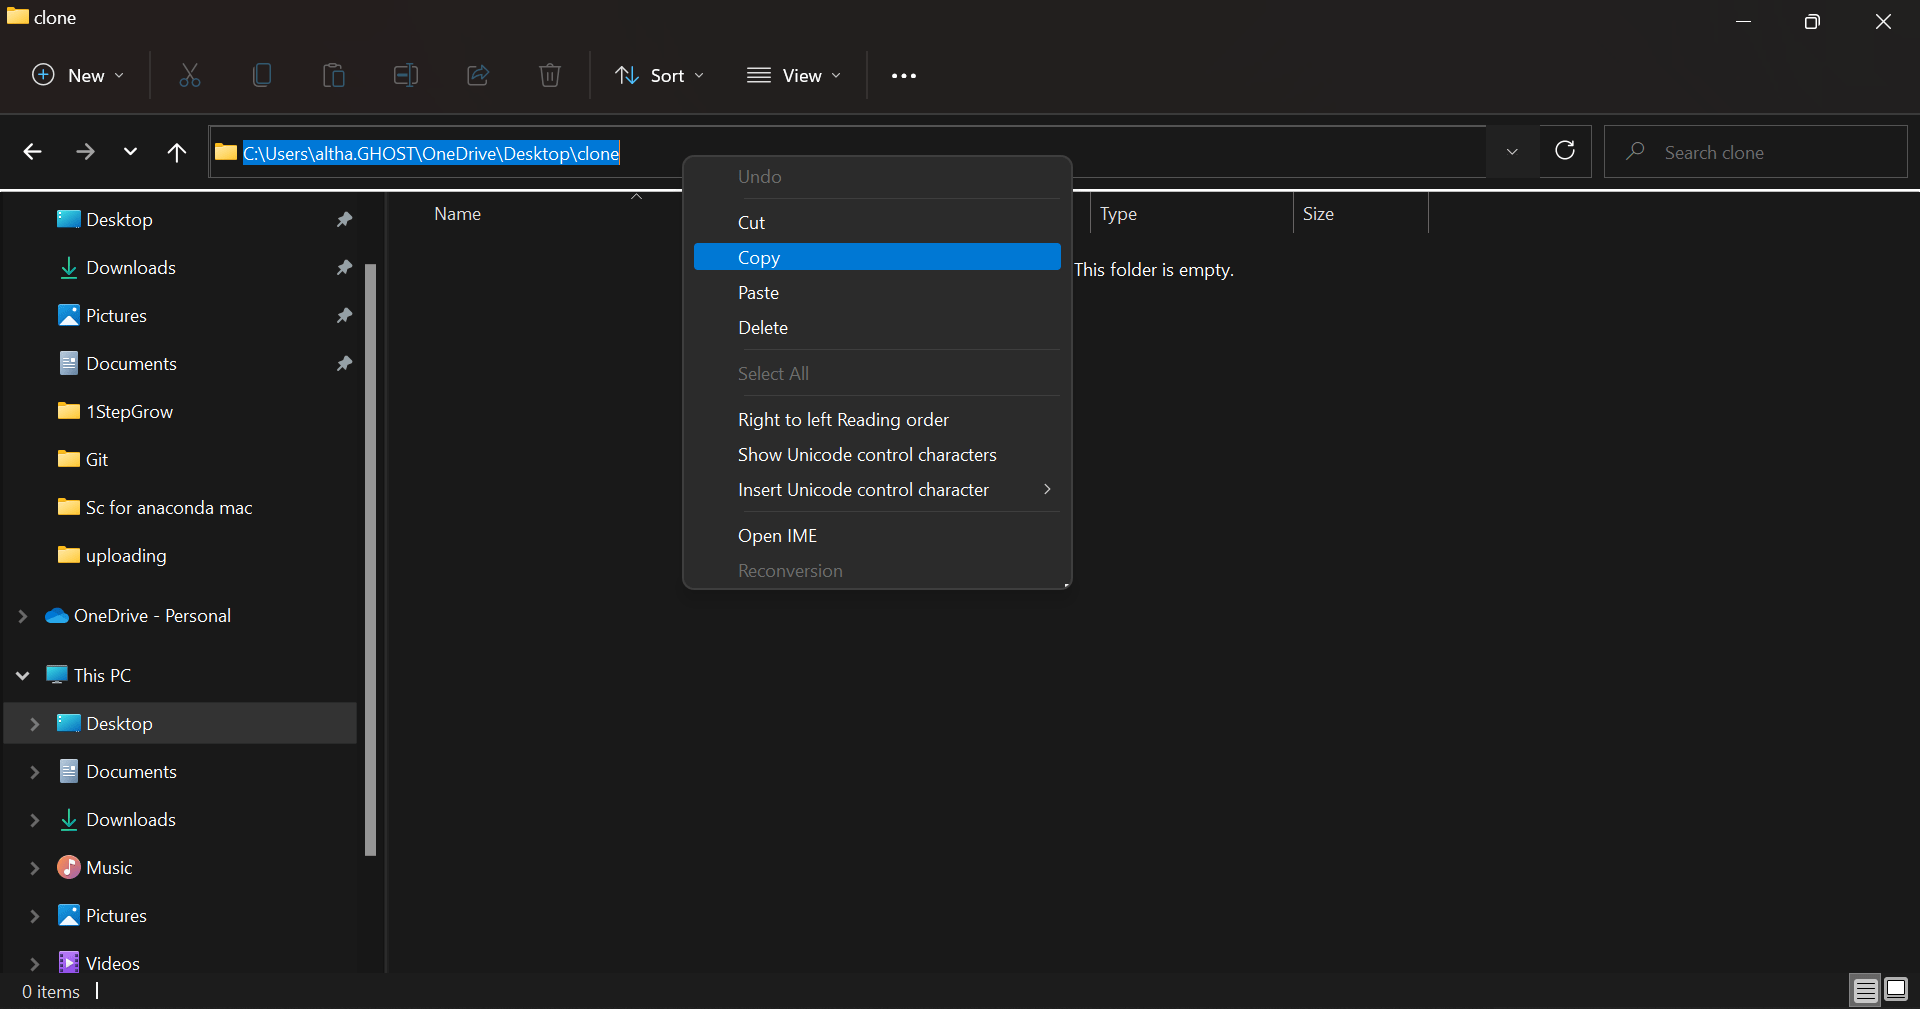
Change your current working directory in Git Bash
To change the current working directory of Git Bash to the directory where we want to clone the file, I’ve used the ‘cd’ command as we did before and pasted the path. This is shown below:
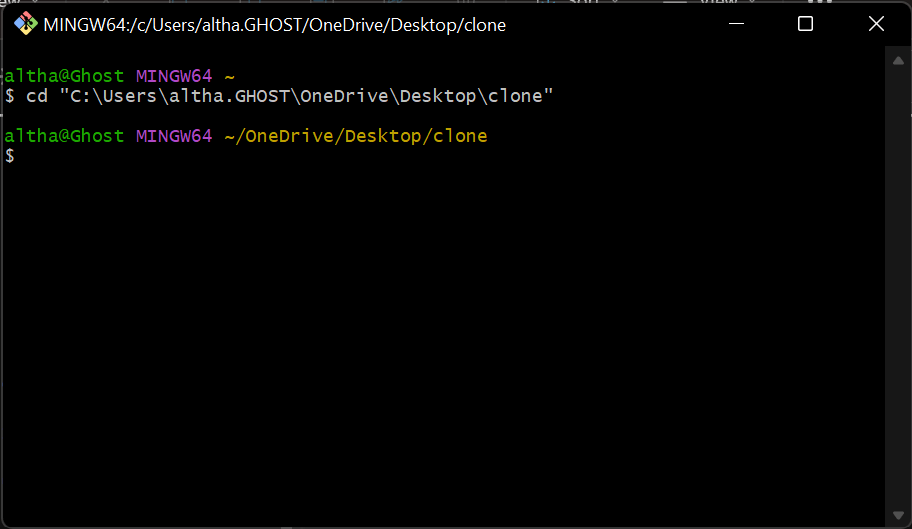
Note: To completely reset the path on Git Bash, just type in the ‘cd’ command without any arguments, and it will take you back to your parent directory.
Copy the URL of the directory that we want to clone from GitHub
Now, we can go to GitHub and copy the URL of the repository we want to clone, as demonstrated below. Note that we can clone any public repository into our computer. For convenience, I’m cloning the previous repository that I created for this tutorial:
Copy the highlighted URL.
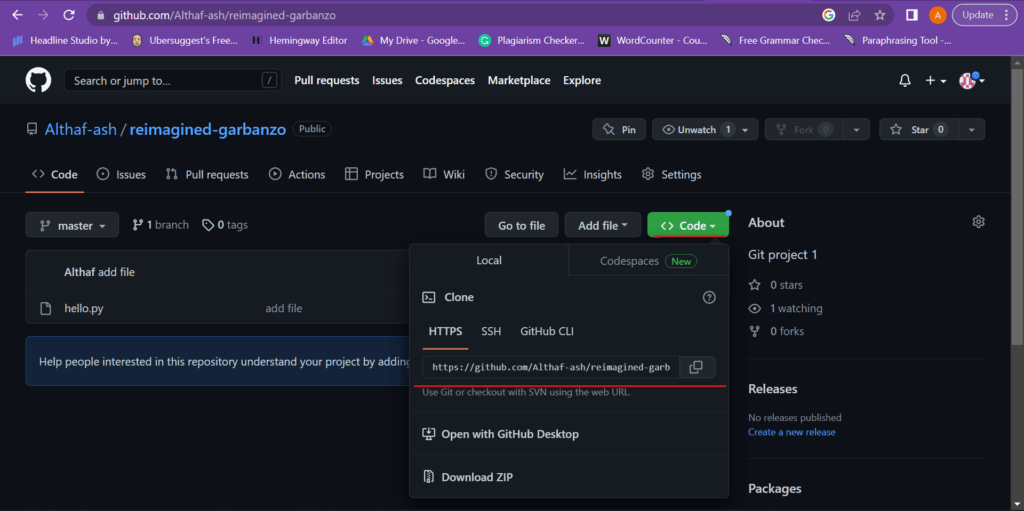
Cloning the repository into our system using git clone command
The git clone command is a Git command that allows you to create a copy of a repository from a remote source (such as GitHub, GitLab, or Bitbucket) onto your local machine. It downloads all the files and commit history from the remote repository and sets up a new Git repository on your local machine with the same files and commit history as the remote repository.
The basic syntax of the git clone command is:
git clone <remote_repository_URL> <local_directory_path>
Here, <remote_repository_URL> is the URL of the remote repository that you want to clone, and <local_directory_path> is the path where you want to create the local copy of the repository.
git clone https://github.com/username/repository.git ~/Desktop/repository
But since we’ve already changed the path, we don’t need to worry about that. Just copy and paste the URL into Git Bash along with the ‘git clone’ command and press enter, and that should get the job done for you.
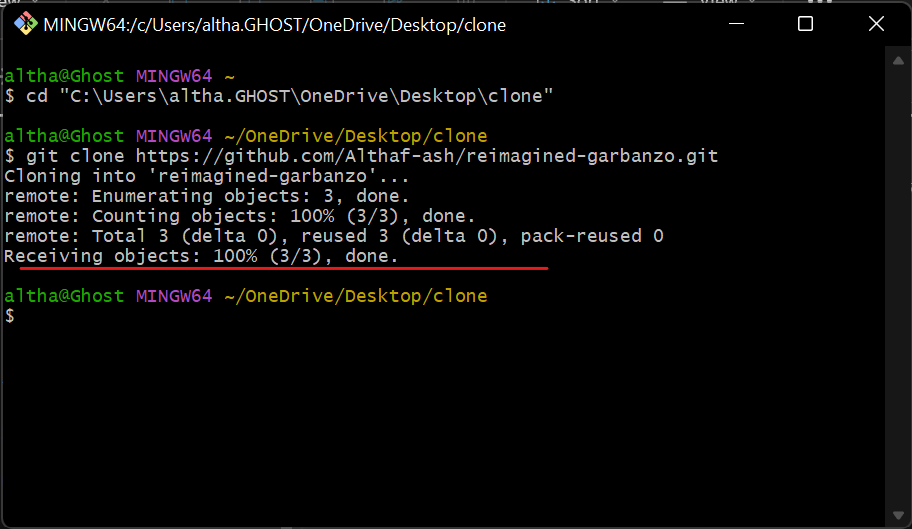
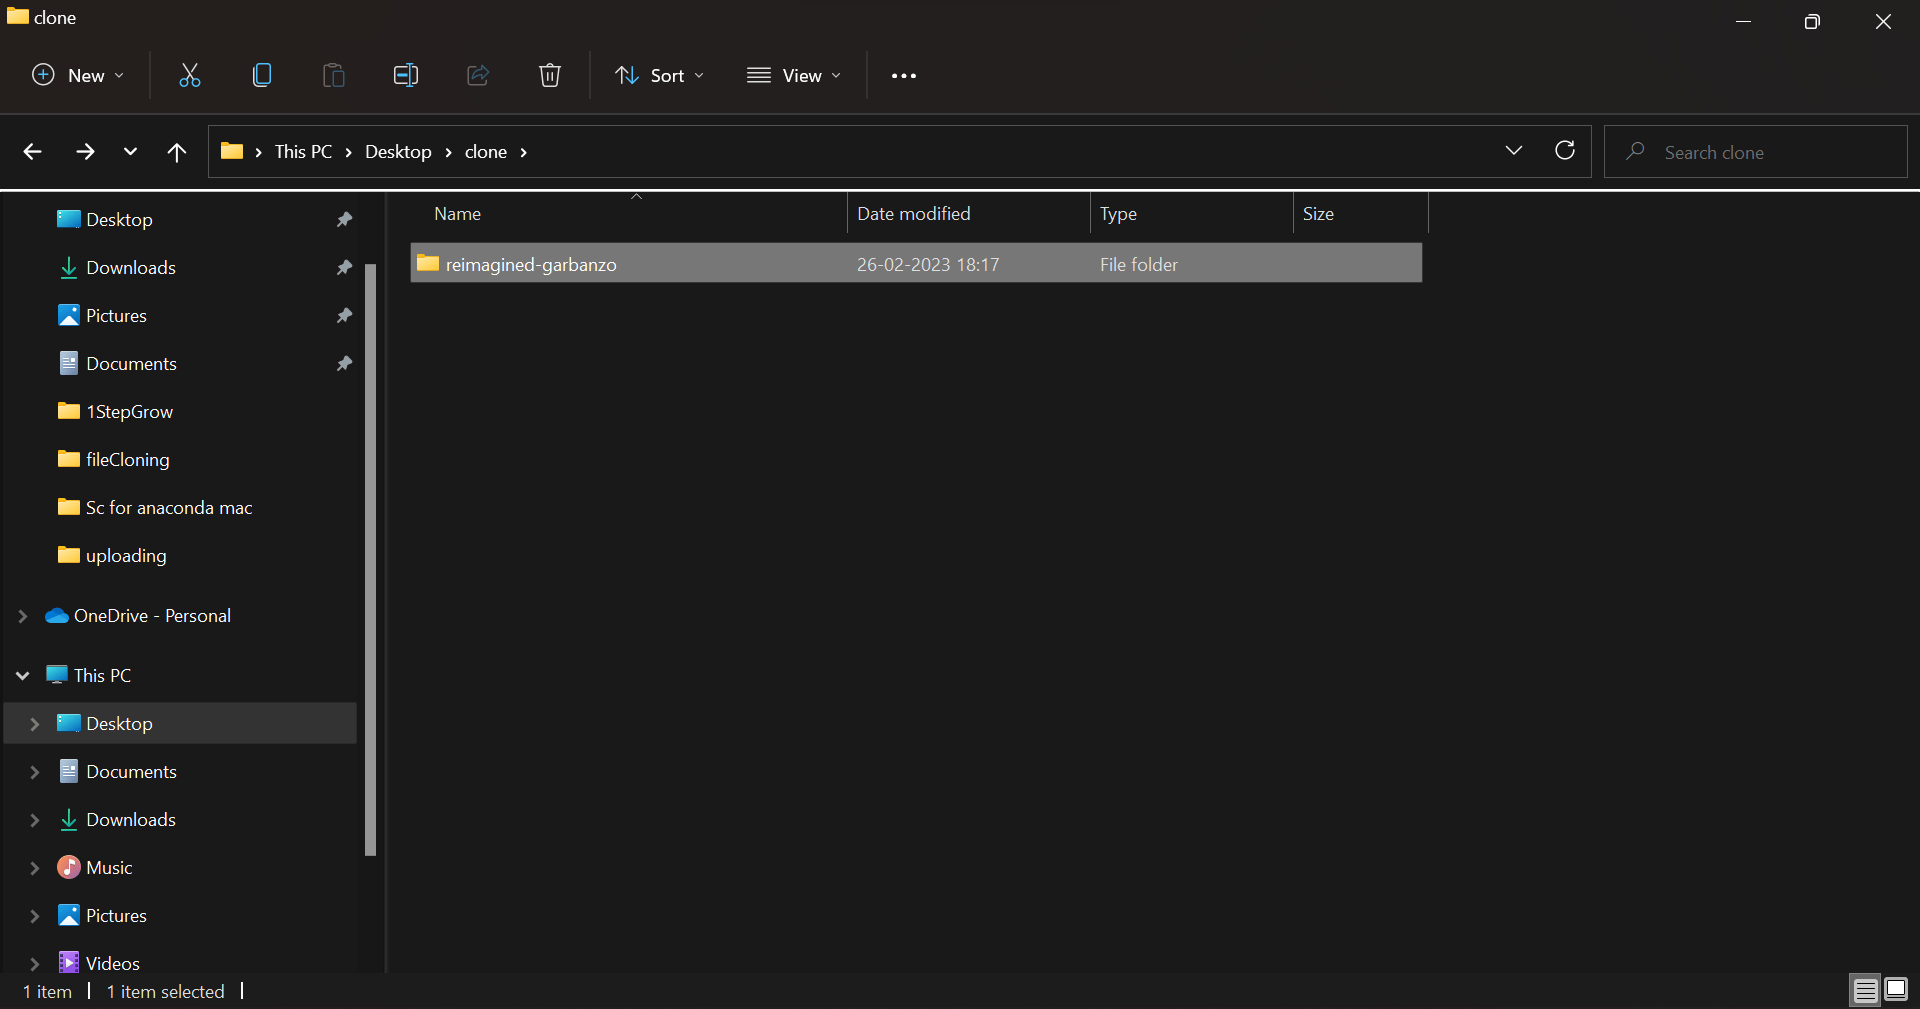
Check the folder where you cloned the file
As the last step, just go to the folder where you cloned the file, and you’ll see that the repository has been downloaded there from GitHub.
In this blog post, we have covered the detailed step-by-step process of setting up a GitHub account and uploading a file from a local repository to a remote repository. In this section I will add a brief summary of all the commands that we have used throughout the blog, for more detailed explanations of all the topics and commands, you can check out my other blog ‘Git Made Easy’, where I have covered everything, you need to know about Git and GitHub in detail.
Commands | Explanation |
git config –global user.name “Your Name” | To configure your name into your Git account |
git config –global user.email “Your Gmail” | To configure your Gmail into your Git account |
git init | To initialize a local repository on your device |
git add <filename> | To add a single/particular file to the staging area |
git add . | To add all the files in the repository to the staging area |
git commit -m “Add new feature to app” | To commit a change to the local repository. -m is a flag used for the commit message |
git log | To view all log containing all the previous commits |
git remote add origin <URL> | To connect our GitHub repository to our Git so that we can upload the files to GitHub. |
git push origin master | To push our file from local repository to remote repository |
git clone <URL>~<Path> | To clone a file from the remote repository such as GitHub into our local device |
I would like to thank all of you guys for taking your time to read the blog, and I hope that it was useful for you. Git and GitHub are very powerful tools in today’s software world, without which landing a job in this field might become difficult. It is one of the very basic and default skills that every software engineer is expected to have.
Mastering Git in one day might not be a simple task; it is something that you will have to do eventually through practice and experience. You guys can apply the knowledge that you have acquired here today and expand it as you grow further. Eventually, you will be a Git master in no time. Stay tuned and follow 1stepgrow for more amazing content.
We provide online certification in Data Science and AI, Digital Marketing, Data Analytics with a job guarantee program. For more information, contact us today!
Courses
1stepGrow
Terms
Anaconda | Jupyter Notebook | Git & GitHub (Version Control Systems) | Python Programming Language | R Programming Langauage | Linear Algebra & Statistics | ANOVA | Hypothesis Testing | Machine Learning | Data Cleaning | Data Wrangling | Feature Engineering | Exploratory Data Analytics (EDA) | ML Algorithms | Linear Regression | Logistic Regression | Decision Tree | Random Forest | Bagging & Boosting | PCA | SVM | Time Series Analysis | Natural Language Processing (NLP) | NLTK | Deep Learning | Neural Networks | Computer Vision | Reinforcement Learning | ANN | CNN | RNN | LSTM | Facebook Prophet | SQL | MongoDB | Advance Excel for Data Science | BI Tools | Tableau | Power BI | Big Data | Hadoop | Apache Spark | Azure Datalake | Cloud Deployment | AWS | GCP | AGILE & SCRUM | Data Science Capstone Projects | ML Capstone Projects | AI Capstone Projects | Domain Training | Business Analytics
WordPress | Elementor | On-Page SEO | Off-Page SEO | Technical SEO | Content SEO | SEM | PPC | Social Media Marketing | Email Marketing | Inbound Marketing | Web Analytics | Facebook Marketing | Mobile App Marketing | Content Marketing | YouTube Marketing | Google My Business (GMB) | CRM | Affiliate Marketing | Influencer Marketing | WordPress Website Development | AI in Digital Marketing | Portfolio Creation for Digital Marketing profile | Digital Marketing Capstone Projects
Jupyter Notebook | Git & GitHub | Python | Linear Algebra & Statistics | ANOVA | Hypothesis Testing | Machine Learning | Data Cleaning | Data Wrangling | Feature Engineering | Exploratory Data Analytics (EDA) | ML Algorithms | Linear Regression | Logistic Regression | Decision Tree | Random Forest | Bagging & Boosting | PCA | SVM | Time Series Analysis | Natural Language Processing (NLP) | NLTK | SQL | MongoDB | Advance Excel for Data Science | Alteryx | BI Tools | Tableau | Power BI | Big Data | Hadoop | Apache Spark | Azure Datalake | Cloud Deployment | AWS | GCP | AGILE & SCRUM | Data Analytics Capstone Projects
Bangalore:
Anjanapura | Arekere | Basavanagudi | Basaveshwara Nagar | Begur | Bellandur | Bommanahalli | Bommasandra | BTM Layout | CV Raman Nagar | Electronic City | Girinagar | Gottigere | Hebbal | Hoodi | HSR Layout | Hulimavu | Indira Nagar | Jalahalli | Jayanagar | J. P. Nagar | Kamakshipalya | Kalyan Nagar | Kammanahalli | Kengeri | Koramangala | Kothnur | Krishnarajapuram | Kumaraswamy Layout | Lingarajapuram | Mahadevapura | Mahalakshmi Layout | Malleshwaram | Marathahalli | Mathikere | Nagarbhavi | Nandini Layout | Nayandahalli | Padmanabhanagar | Peenya | Pete Area | Rajaji Nagar | Rajarajeshwari Nagar | Ramamurthy Nagar | R. T. Nagar | Sadashivanagar | Seshadripuram | Shivajinagar | Ulsoor | Uttarahalli | Varthur | Vasanth Nagar | Vidyaranyapura | Vijayanagar | White Field | Yelahanka | Yeshwanthpur
Other Top Cities:
Mumbai | Pune | Nagpur | Delhi | Gurugram | Chennai | Hyderabad | Coimbatore | Bhubaneswar | Kolkata | Indore | Jaipur and More