Object Oriented Programming in Python: Part – 2

Table of Contents

Introduction:

Welcome back, adventurers of code! You’ve successfully navigated through the foundational waters of Object-Oriented Programming (OOP) in Python in Part One. Now, it’s time to take your OOP journey to the next level in Part Two. In this chapter, we’re diving even deeper into the realm of OOP, uncovering advanced concepts, exploring real-world examples, and honing your skills to wield the power of OOP more effectively.

Classes and Objects in Oops

Welcome to the exciting realm of Classes and Objects, where we dive deep into the heart of Object-Oriented Programming (OOP). In this chapter, we’ll uncover the magic behind creating blueprints for objects and bringing them to life in Python. Just as architects design buildings from blueprints, programmers use classes to define the structure and behavior of objects, and objects are the living instances of those classes.

Defining a class in Python

In Object-Oriented Programming, a class serves as a blueprint or template that defines the structure and behavior of objects. Think of a class as a recipe for creating objects with specific attributes and methods. Let’s break down how to define a class in Python, step by step.

Creating a Class

To create a class, you use the class keyword followed by the class name. By convention, class names should start with an uppercase letter. Here’s the basic syntax:

02
  • Attributes: These are variables that store data associated with the class. They define the characteristics or properties of the objects created from the class.
  • Methods: Are the functions which are defined within the class. They represent actions that the objects can perform.
Steps to Create a Class:
  • Choose a Meaningful Name: The class name should reflect the nature of the objects it will represent. By convention, use CamelCase (capitalize each word and remove spaces) for class names.
  • Define the Class: Use the class keyword followed by the class name. Start the class block with a colon :.
  • Add Attributes: Inside the class block, define attributes (variables) that represent the data associated with the class. These attributes will define the state of the objects.
  • Create Methods: Define methods (functions) that describe the actions the objects can perform. These methods operate on the attributes and encapsulate the behavior of the class.
  • Constructor Method: Often, a special method called __init__() is defined within the class. It acts as a constructor and initializes the attributes when an object is created.
  • Add Other Methods: Define additional methods as needed to expand the functionality of the class.
Conventions and Rules
  • Class Naming: Use meaningful names that reflect the purpose of the class. Start the name with an uppercase letter and follow CamelCase (e.g., Car, Person, StudentInfo).
  • Indentation: Maintain consistent indentation within the class block. Use four spaces for indentation (recommended by Python’s style guide).
  • Attribute Naming: Attribute names are typically lowercase with underscores (snake_case) to improve readability (e.g., color, age, student_id).
  • Method Naming: Method names are lowercase with underscores (snake_case) as well. Use verbs to describe the actions (e.g., accelerate, get_age).
Example 1:

Let’s create a simple class named Student with attributes name and age, and a method introduce().

03
Explanation:
  • Class Definition:

We start by defining the Student class using the class keyword. This class will represent students and encapsulate their attributes and behavior.

  • Class Attribute:

Inside the class, we define a class attribute school. This attribute is shared among all instances of the class. It represents the school name that all students attend.

  • Constructor Method (__init__):

The __init__ method is a special method that acts as a constructor. It initializes the object’s attributes (name and age) when an object is created. The self parameter refers to the instance being created.

  • Attributes and Initialization:

When we create an object (student1) of the Student class, we provide values for the name and age attributes. The __init__ method is automatically called, and the provided values are assigned to the object’s attributes.

  • Method introduce():

Introduce method is defined within the class. It uses the object’s attributes (name, age, and school) to print a personalized introduction for the student.

  • Object Creation and Method Call:

We create an instance of the Student class named student1. Using the introduce() method, we call the method on the student1 object. The method accesses the object’s attributes and prints the introduction.

In this example, we’ve successfully created a class that defines the structure and behavior of students. By creating an object from this class, we can interact with the class’s attributes and methods to model real-world concepts in our code. This demonstrates the power of classes in organizing data and behavior in an elegant and reusable manner.

Example 2:

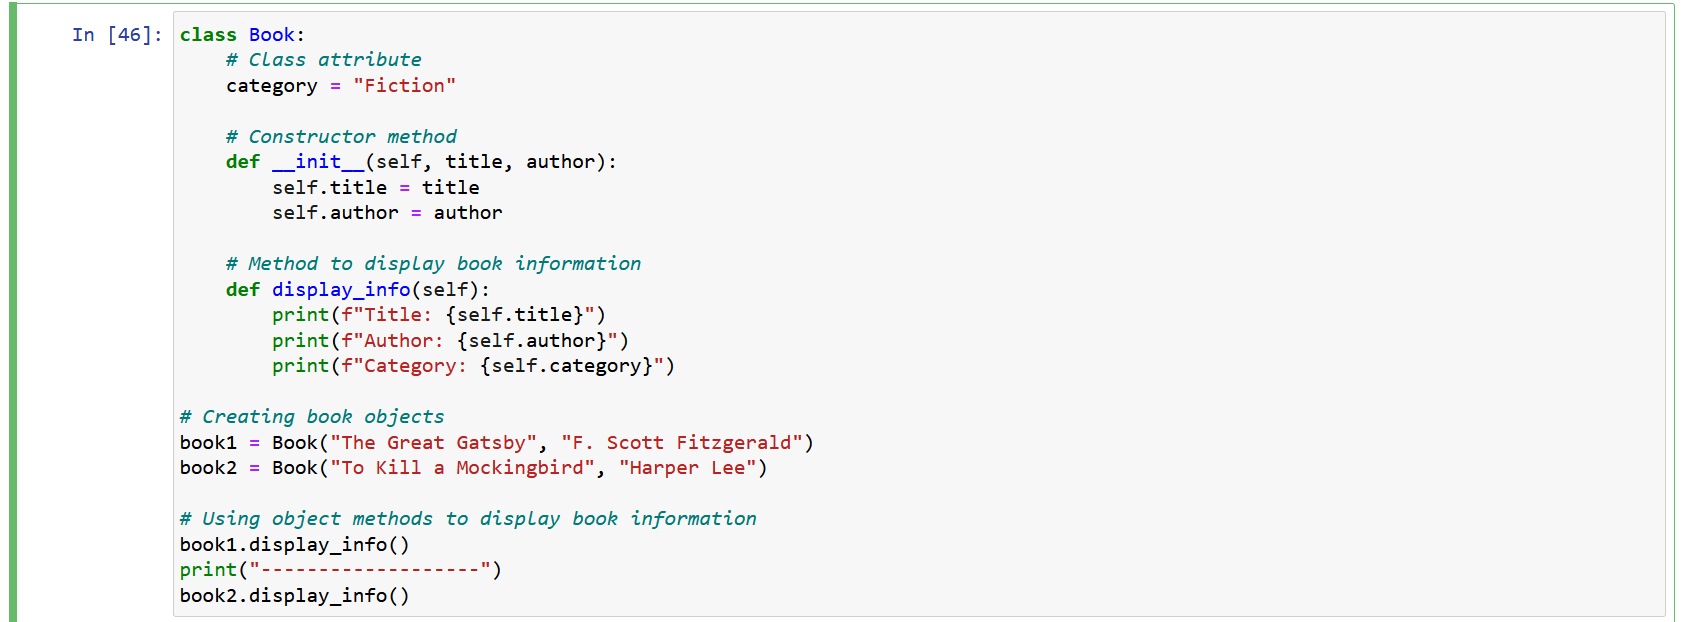
Let’s explore another example involving a Book class that represents books in a library.

04
Explanation:
  • Class Definition (Book):

We define a class named Book to represent books. It encapsulates attributes related to books and methods to display book information.

  • Class Attribute (category):

The class attribute category is set to “Fiction”, representing the common category for all books in this example.

  • Constructor Method (__init__):

__init__ method initializes attributes (title and author) when book objects are created. 

Self parameter refers to the instance being created.

  • Attributes and Initialization:

We create two Book objects (book1 and book2) with specific titles and authors.  __init__ method assigns these values to the object’s attributes.

  • Method display_info():

The display_info method displays information about the book, including its title, author, and category.

  • Using Object Methods:

We call the display_info() method on both book1 and book2 objects. This method accesses the object’s attributes and displays the book’s details.

Output:
05

By using the Book class, we’ve structured our code to represent books in a library. Creating objects from this class allows us to interact with book attributes and methods to access and display book information. This example illustrates how classes provide a blueprint for creating objects that capture real-world entities and their characteristics, making our code more organized and readable.

Important Points
  • The __init__ method is a special method (constructor) that initializes object attributes when an object is created.
  • Self parameter refers to the instance of the object. It’s automatically passed to methods when you call them on an object.
  • Class attributes are shared among all instances of the class, while instance attributes are unique to each object.
Summary

Defining a class in Python is the first step toward creating reusable and structured code. Classes encapsulate attributes and methods, allowing you to create objects that mimic real-world entities. As you progress through your programming journey, classes will become your building blocks for crafting complex systems with elegance and efficiency.

In the next section, we’ll explore how to create and interact with objects instantiated from classes. Stay tuned for a deeper dive into the world of objects!

Creating Objects from a Class:

Once you’ve defined a class in Python, you can create objects (instances) from that class. Objects are concrete instances of the class, each with its own unique attributes and capabilities. Let’s delve into the process of creating objects, the syntax involved, important considerations, and a practical example.

Creating Objects: Syntax

To create an object from a class, you use the class name followed by parentheses. These parentheses can be empty, or you can pass arguments to the constructor method (if defined).

06
Steps to Create Objects
  • Import or Define the Class: Make sure the class you want to create objects from is either defined in the current script or imported from another module.
  • Use the Class Name: To create an object, use the class name followed by parentheses. You can pass constructor arguments within the parentheses if the __init__ method requires them.
  • Assign to a Variable: Assign the created object to a variable for future reference and usage.
Conventions and Considerations
  • Variable Naming: Use meaningful variable names that reflect the purpose of the object. Variable names should be lowercase with underscores (snake_case) for improved readability.
  • Constructor Arguments: If the class’s __init__ method requires arguments, make sure to provide them in the correct order when creating the object.
  • Class Blueprint: Remember that objects inherit attributes and methods from the class. Any changes made to the class will impact all objects created from it.
Important Considerations
  • Object Identity: Each object you create is a distinct instance of the class, with its own memory space. Modifying one object does not affect others.
  • Constructor Arguments: If the constructor method requires arguments, ensure you provide them in the correct order when creating the object.
  • Class Blueprint: Objects inherit the attributes and methods defined in the class. Changes made to the class will affect all objects created from it.
Example 1:

Let’s continue with the Book class example. We’ll create objects representing different books using the class’s constructor method.

08

In this code example, we’re introducing the concept of object creation using the Book class. The Book class serves as a blueprint to create instances of books. Each book object encapsulates its own data, such as the title and author.

  • Class Definition (Book):

First we define a class called Book, which represents books in our program. Inside the class, there’s a constructor method named __init__, which initializes the attributes of the book object.

  • Object Creation:

We then proceed to create two book objects, book1 and book2, using the Book class. The necessary information is provided (title and author) as arguments to the constructor.

  • Accessing Object Attributes:

After creating the book objects, we can access their attributes using dot notation. For example, book1.title allows us to retrieve the title of the first book object. Similarly, book2.author lets us access the author of the second book object.

By creating objects from the Book class and accessing their attributes, we demonstrate how classes provide a structured way to create instances with predefined attributes and behavior. This foundational example showcases how objects can be thought of as real-world entities, each with its unique characteristics and capabilities.

Constructor Method: Initialization

When you create an object from a class, the constructor method (__init__) is automatically called. It initializes the object’s attributes using the provided arguments, if any.

Imagine you’re building a robot assembly line. Each robot you create needs certain parts to function properly. The constructor method is like the assembly line worker who puts together these parts to build a complete robot.

In Python, when you create an object from a class, the constructor method (__init__) is automatically called. This method knows how to set up the initial state of the object. It’s like a set of instructions that the assembly line worker follows to make sure the robot starts with all the necessary components in place.

Here’s how it works:
  • Creating an Object:

When you create an object from a class (like making a new robot), Python looks for the __init__ method inside the class definition.

  • Providing Arguments:

If the __init__ method expects some information (like the type of robot or its color), you provide that information when you create the object. These pieces of information are called “arguments.”

  • Initializing Attributes:

The __init__ method takes the provided arguments and sets up the object’s attributes (parts of the robot) accordingly. It ensures that the object starts with the correct values for its attributes.


So, just like the assembly line worker makes sure each robot starts with the right parts, the constructor method ensures each object starts with the right attributes. This way, when you create an object, it’s already set up with the data it needs to function properly.

Remember, the constructor method is there to help you create objects with the correct initial state. It’s an essential part of OOP that makes working with objects in Python much easier and more organized.

Defining the __init__ Method:

To define the __init__ method, include it within your class definition. It takes at least one argument (self), which refers to the instance being created, followed by any additional arguments you want to provide during object creation.

10
  • Class Definition:

The __init__ method is defined within the class you’re creating. Replace ClassName with the actual name of your class.

  • Method Name:

Name of the method is __init__, which is Python’s special method for initializing objects.

  • Parameters:

This method accepts parameters. The first parameter is always self, which refers to the instance being created. Following self, you can define additional parameters (arg1, arg2, etc.) that you’ll use to initialize the object’s attributes.

  • Attribute Initialization:

Inside the __init__ method, you set up the initial values of the object’s attributes. Use self.attribute_name = argument to assign values to attributes. attribute_name is the name of the attribute, and argument is the corresponding argument you pass when creating the object.

Example: Car Class
09

In this example, the Car class uses the __init__ method to initialize the attributes of car objects, such as make, model, and year.

Take away:

The __init__ method is a fundamental building block of classes, enabling you to provide initial values to object attributes. By customizing object initialization, you create instances that are properly set up and ready to use. This method streamlines the process of creating objects, ensuring they start with the desired state and facilitating their purpose within your code.

Instance Variables and Instance Methods

In Object-Oriented Programming, instance variables and instance methods are key concepts that allow you to work with objects in a dynamic and flexible way. They enable you to store unique data for each object and define behavior specific to those objects. Let’s delve into what instance variables and instance methods are and how they contribute to the power of OOP.


Instance Variables

Instance variables are unique attributes that belong to each individual object created from a class. They store data that varies from object to object, allowing you to represent diverse characteristics of instances. Defined within the constructor method (__init__) and are accessed using the self-keyword.


Instance Methods

Instance methods are functions defined within a class that operate on the attributes of individual objects. These methods can access and manipulate instance variables, enabling you to perform actions specific to each object. Just like instance variables, instance methods are also accessed using the self-keyword.


Example: Bank Account Class
10

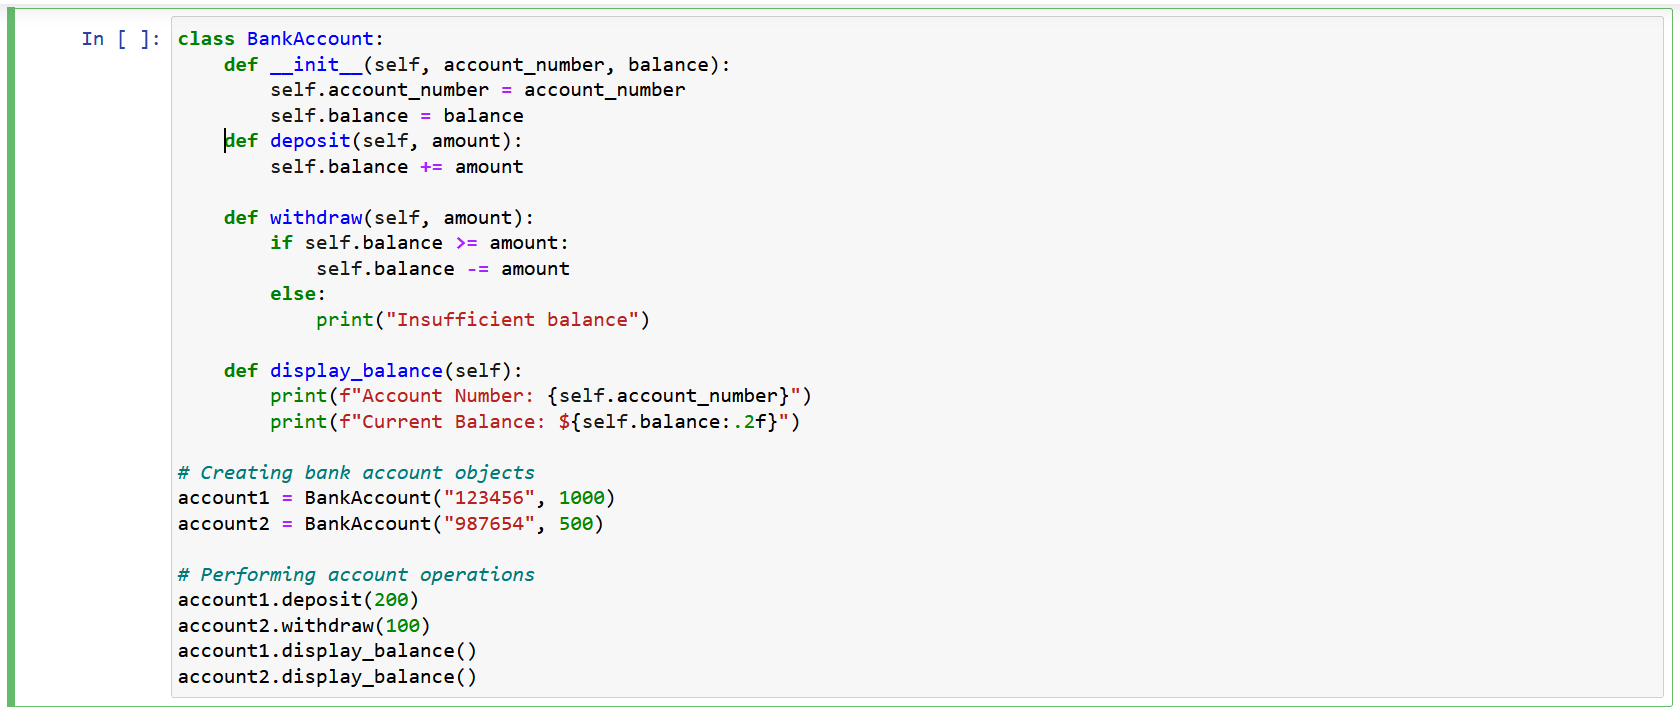
In this example, the BankAccount class demonstrates the use of instance variables and instance methods:

  • account_number and balance are instance variables, storing unique data for each bank account object.
  • deposit(), withdraw(), and display_balance() are instance methods, allowing operations specific to each bank account.

Instance variables and instance methods empower you to model real-world situations more accurately and create objects that can perform context-specific actions. By customizing data and behavior for each object, you harness the true essence of Object-Oriented Programming.

Output:
11

Understanding and utilizing instance variables and instance methods allow you to create objects that are not only capable of holding different data but also performing unique actions. These concepts play a crucial role in modelling real-world scenarios and making your code more organized and reusable.

Using Constructors and Destructors

Constructors and destructors are special methods in Object-Oriented Programming (OOP) that help you set up and clean up object instances. The constructor, usually denoted as __init__, initializes attributes when an object is created. The destructor, named __del__, is responsible for releasing resources and performing cleanup when an object is no longer needed. In this section, we’ll explore how to use constructors and destructors effectively.

Constructors (__init__ Method)

The constructor method is automatically called when you create an object from a class. It initializes attributes, ensuring that objects start with the desired state. Here’s how to define and use a constructor:

12
  • Definition: Constructor is defined within the class as the __init__ method.
  • Parameters: The method accepts parameters, including at least self, which refers to the instance being created, and any additional parameters required for attribute initialization.
  • Attribute Initialization: Inside the __init__ method, you assign values to the object’s attributes using the format self.attribute_name = argument.
Destructors (__del__ Method)

The destructor method is automatically called when an object is about to be destroyed. It’s less commonly used compared to constructors and is used for resource cleanup. Here’s how to define and use a destructor:

13
  • Definition: The destructor is defined within the class as the __del__ method.
  • Cleanup Code: Inside the __del__ method, you can write code to release resources, close files, or perform other cleanup tasks before the object is deleted.
Example: Using Constructor and Destructor
14

In this example, we define a Person class with a constructor and a destructor. The constructor initializes the name attribute, and the destructor provides a farewell message when the objects are deleted.

Output:
15
Take Away:

Constructors and destructors play distinct roles in managing object instances. Constructors set up initial attributes, while destructors perform cleanup tasks. Proper usage of these methods enhances code organization and resource management, making your object-oriented programs more robust and efficient.

Conclusion to Part 2

In this second part of our exploration into Object-Oriented Programming (OOP) in Python, we delved deeper into the world of classes and objects, uncovering a multitude of powerful concepts. We started by understanding the importance of classes as blueprints for creating objects that encapsulate data and behaviours. We then dived into the realm of instance variables and instance methods, learning how they enable customization and interaction on a per-object basis.


While we’ve covered a substantial amount, the world of OOP is rich and multifaceted. There’s still more to uncover and learn, including inheritance, polymorphism, and advanced design patterns. We’re not stopping here—Part 3 awaits, where we’ll dive even deeper into the complexities of Object-Oriented Programming in Python.


So, continue your journey with us as we unravel the remaining chapters of OOP. If you enjoyed the blog follow 1stepgrow.